Guatemala profiles: tasting and fine tuning

After so much pleading with others to post their roast curves along with tasting notes, I thought it was time for me to ante up. Beware this is long, and take my amateur tasting notes for what they’re worth… perhaps very little :slight_smile:

The subject is this Guatemala Antigua Luis Pedro Zelaya crown jewel from Royal. It’s moderately priced, and of today some is still available.

Royal’s tasting notes show the sweetness meter nearly pegged at maximum! I like Guatemalans and Bourbons in general, and always strive for sweetness, so took a small risk and laid in a 12 lb. supply, hoping to eventually dial in some great profiles.

Here are four roasts. Except as noted, each started with a cold roaster, 20 minute preheat at 210C, and 1 lb. batch size. The general strategy was a first minute at P7 for a sort of mini-soak to avoid overheating the drum, then high power through yellowing. Reduce power before FC. Minimize use of fan, just enough to remove most of the chaff.

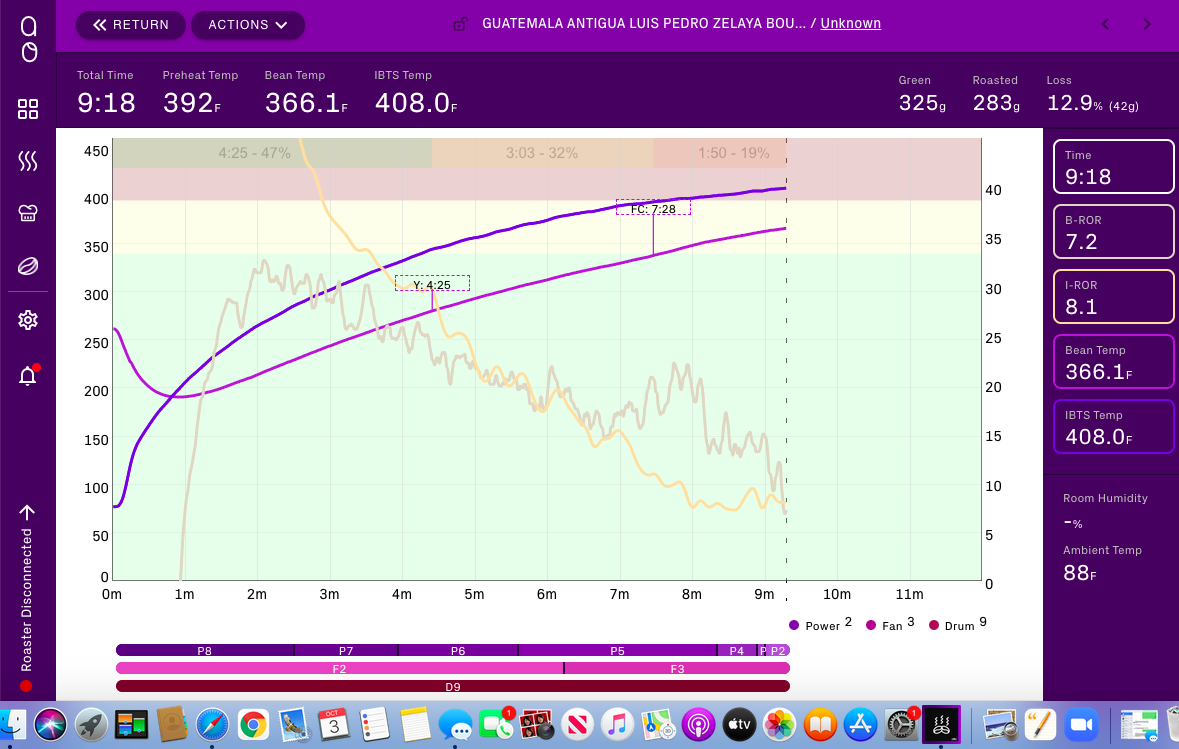
The first try has a drop temperature of 215C for a “medium” roast to establish a baseline:

The bean turned out to produce relatively little chaff, so fan could be kept quite low throughout. Throughout all of this I’m ignoring the nasty BT-RoR spike around FC and trusting the smoothly decreasing IBTS-RoR. The flick at the end got me by surprise. Tasting notes (7 day rest): Dry aroma is strongly molasses, changing to vanilla brown sugar when wet. Hot cup has rich body with cane sugar and red apple with light herbal bitterness. Good medium roast.

The second try was a lighter variant, 212C drop. In an attempt to eliminate the flick I cut power and increased fan at the end of the roast, and dropped 10 seconds and 3C earlier. The overlay is the 215C baseline roast.

Notice that the weight loss decreased from 13.4% to 12.7%. Tasting notes (7 day rest): Hot cup is dominated by sweet light brown sugar and clean orange juice, with hints of dark chocolate, Nice rich smooth body, very low acidity. No off-putting bitterness. Plenty dark. Cooling strengthens sweet orange juice. Great cup

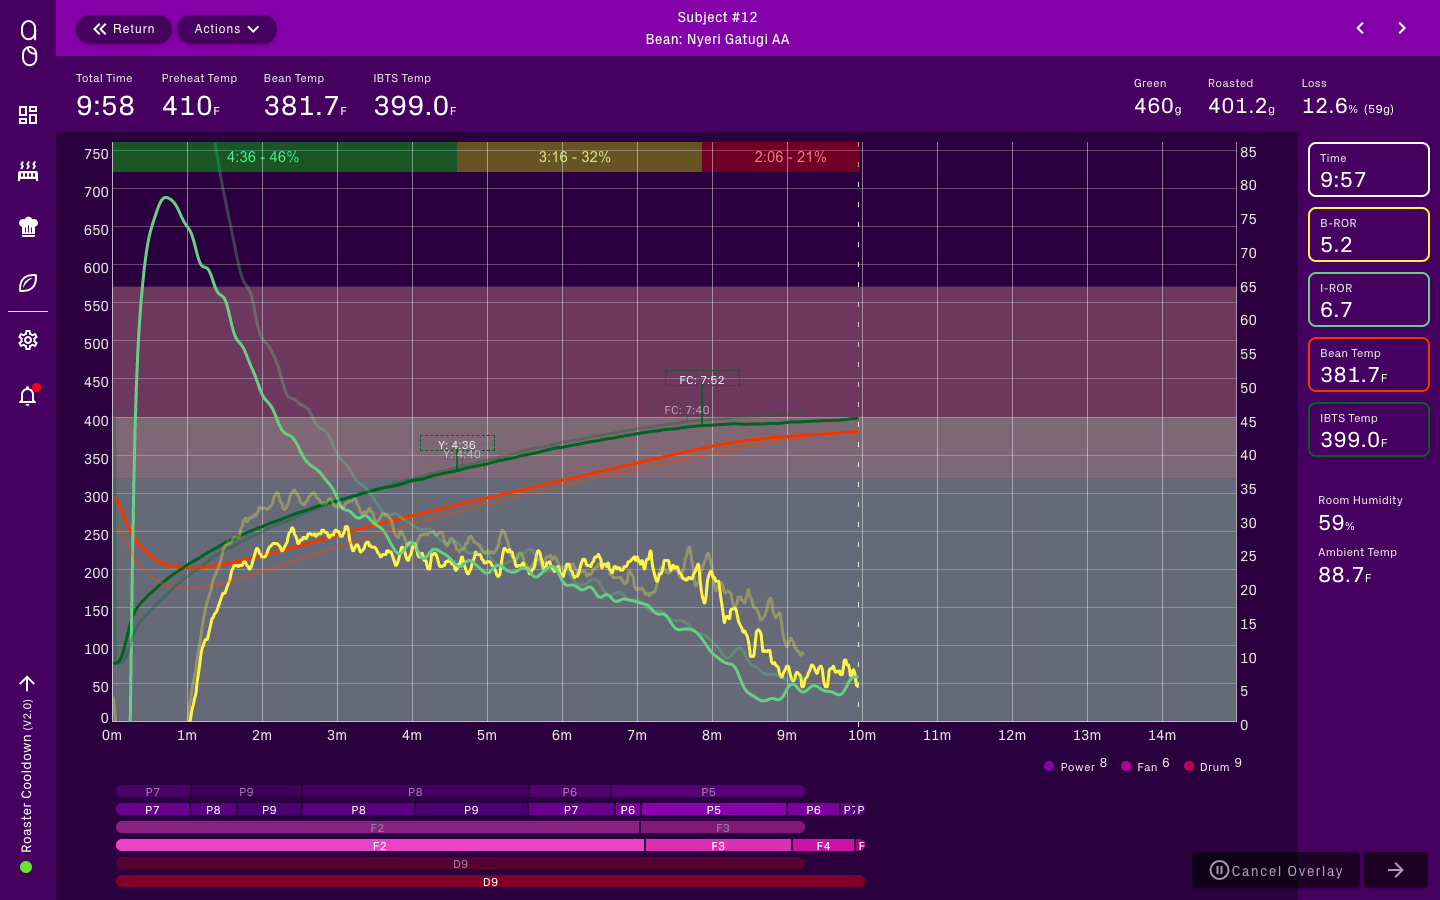
The thiird try was a darker variant, 217C drop. This one was the second in a back-to-back roast, which is rare for me. I added beans when the bullet announced “charge”, and kept power up after yellowing, riding through FC at P7 instead of P6, with power cuts and fan increases at the end of the roast similar to the 215C baseline profile (overlay).

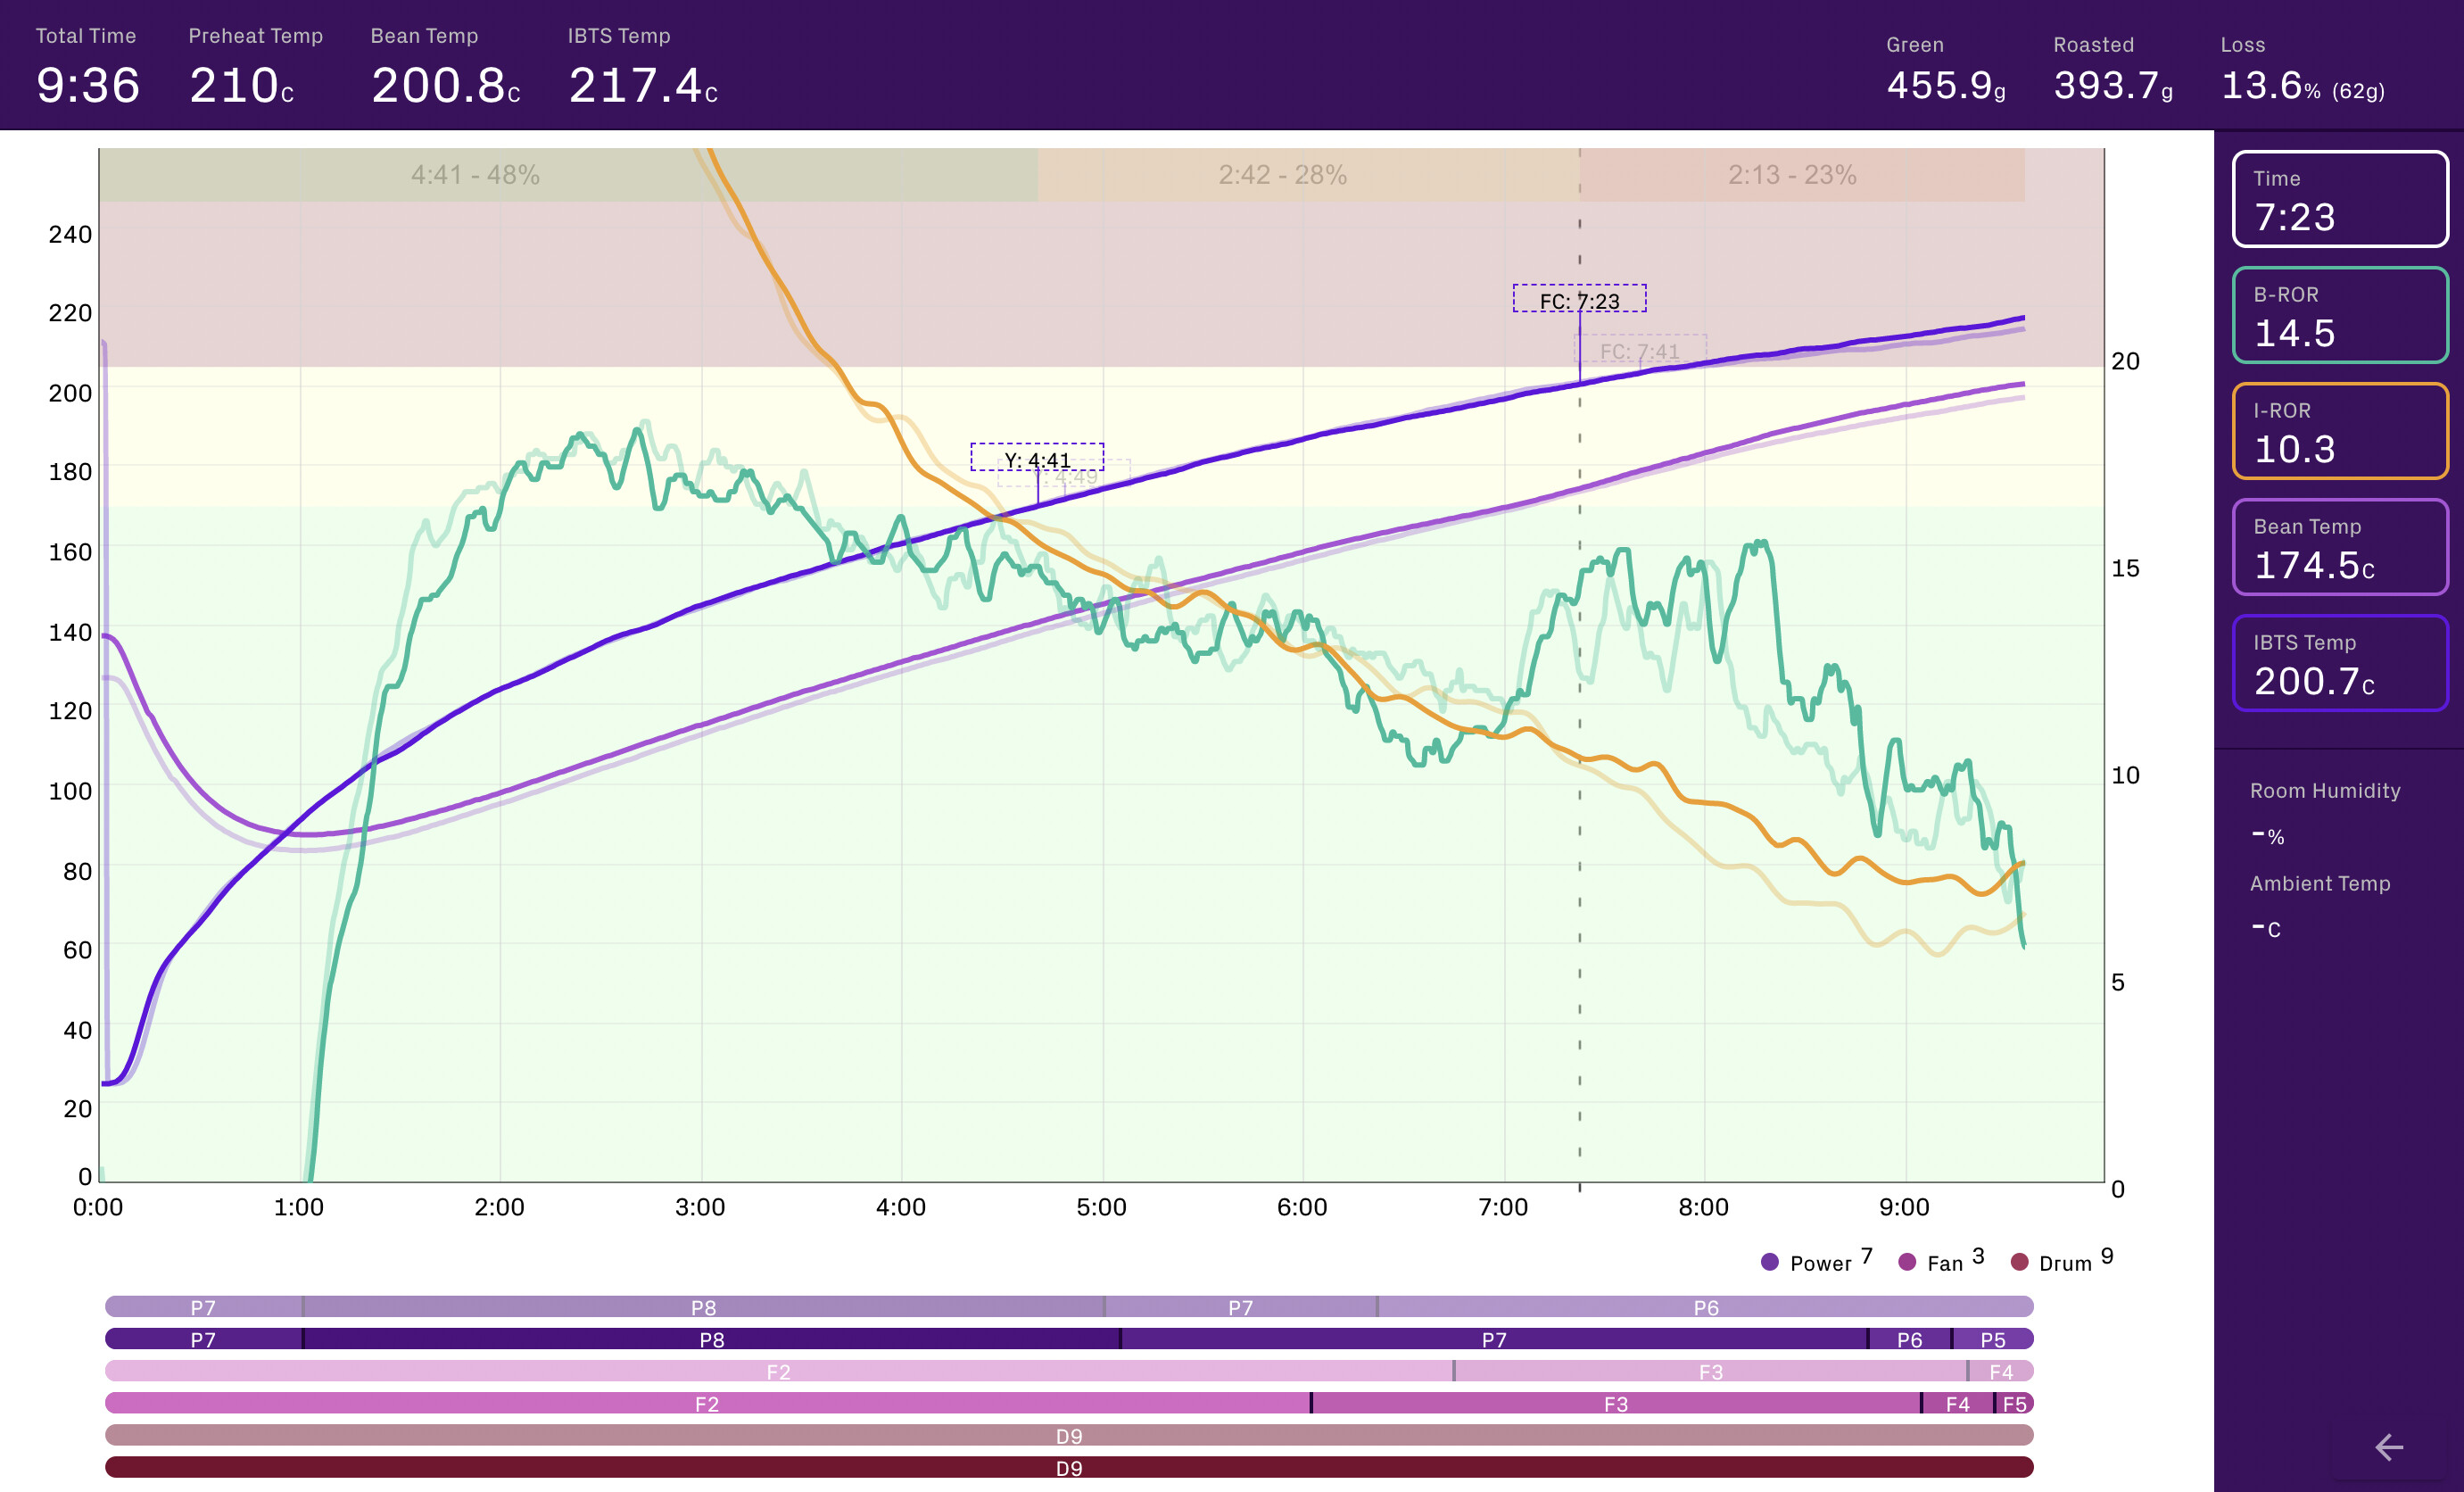
Notice that in spite of a very different preheat regimen, the first part of the roast followed the baseline quite closely, suggesting that 20 minutes preheats the drum pretty adequately. The higher RoR after FC allowed the roast to reach 217C with only an extra 15 seconds of development compared to baseline, yielding only 13.6% weight loss. Tasting notes: (day 4) dry aroma of molasses, wetting adds hints of cardboard. Hot cup has dark brown sugar molasses with stewed peach. Mild bitterness. Very good, chuggable. (day 15) chocolate, red apple, mild orange peel and pecan skin bitterness, good sweetness. Needs stronger brewing now. Very good, chuggable

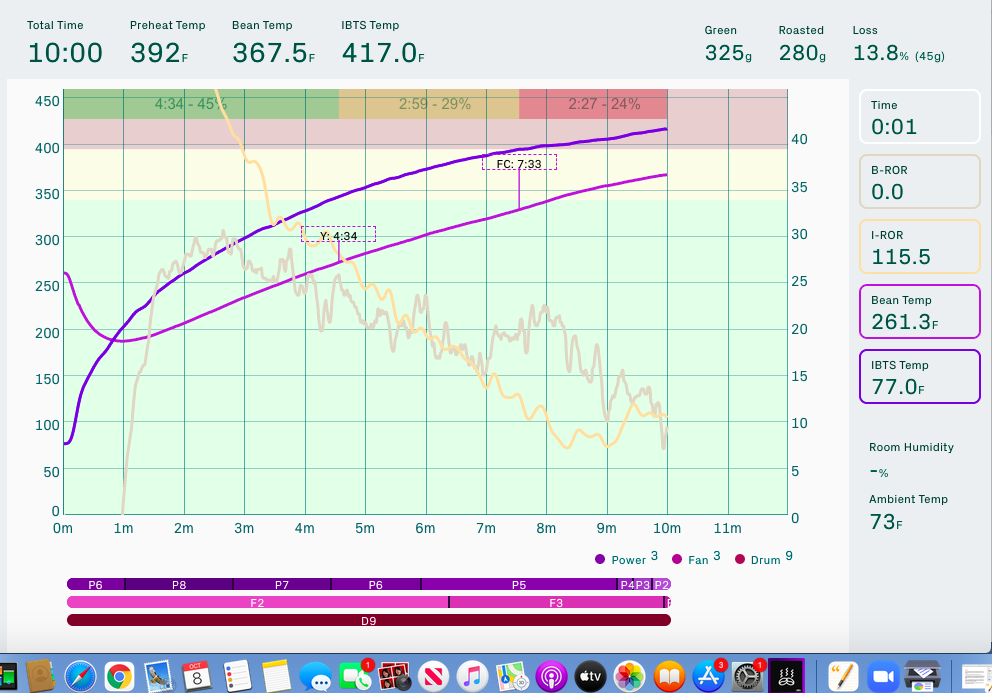
The fourth try was the lightest yet, 208C drop, attempting to follow Royal’s roast curve a little more closely and strengthen sweetness even further. The baseline for this roast is the second roast (212C) above, which is used as the overlay. The strategy was to try P9 to shorten the drying phase, then cut power more aggressively just before FC and drop just before that pesky flick.

I was surprised that adding 90 seconds at P9 appeared to have zero effect on the first part of the roast. The more aggressive power cuts directly to P6 and then P5 lowered the RoR nicely post-FC. I dropped this roast with 20 seconds and 4C less development time than the 212C roast. There were several snaps of FC in the pan, and the beans appearance was quite mottled. Strangely, weight loss increased slightly to 12.9%, maybe due to using P9 early? Tasting notes (day 7) Sweet cane sugar dominates. Brighter and more acidity than prior roasts, with lemon added to green apple. Cleaner, clearer body. Hint of caramel, especially in cooling. Suprisingly different than 212 roast. EXCELLENT light roast.

In summary this is a very versatile bean. My preferences are shifting toward lighter, sweeter roasts so the last one was for me the best. There are so many more variables to adjust and play with, much more fun experimentation to do. Hope this is at least entertaining if not useful.

19 Likes

Very good post, very informative. I got a lot out of it.
Keep it up.
(I’m useless at putting actions or ideas into words, so enjoy it when other people can)

Very comprehensive comparisons Brad. I have homework to do now. My one roast of this bean so far was at the light end where you liked it best. I also have a bit of that pesky flick that needs to go. As I had mentioned, this roast is pleasant, very sweet with mild apple acidity. I found at this roast level, the brew was a bit thin and lacking body. I liked it better as espresso where the concentrated sugars, acids and pleasant fruit melded together. I did get an astringent finish perhaps from the flick. I thought darker would suit my tastes better and I’ll try that next. I have to figure out how to keep the roast time the same yet enter 1C with enough momentum and ROR to keep development at a reasonable %. I will study your roasts though I’m still using a 325 gm charge.

2 Likes

@bradm This is great analysis and thanks for sharing. I was doing something similar with my 3 Sumatra Peaberry roasts yesterday (feel free to take a look). I haven’t cupped them yet. Maybe this afternoon.

Cheers!

1 Like

Thanks for sharing bradm, I’m going to try your approach for roast 4, low pre heat with a high p setting after a little bit, I have been trying to figure out how to reduce the Mali phase while getting a 5ish min de and it looks like you nailed it! I’ve been stuck at 4+ min Mali phase which even with dropping light at 205c 1ish min dev time 10min total, resulted in over development/burnt flavours I’m just hoping the two natural beans I have at the moment can take the heat, I’ll report back but I’m very hopeful!

Edit…

So just tried two roasts with this strategy in mind and I think it’s done the trick! I’m trying to get close to a Tim Wendelboe roast of an Ethiopian natural, of course I haven’t tasted it yet, but the outer colour and ground colour look pretty close!

TW one is on the left, thanks so much @bradm !

Hey @jacksmith121asdk, interesting that your first roasts of that Ethiopian tasted overdeveloped/burnt even though the curves look great and the drop temperature and weight loss were very reasonable. I wonder if this is a case of scorching early in the roast? Rob Hoos talks about that at about 15:00 into this webinar

Rob’s kind of scary comments about defects that are no longer observable at the end of the roast have me now using the tryer during drying once in a while just to check.

Didn’t mention here that I mark yellow when there are no more green beans, so maybe later than some other roasters.

Hope your latest roasts deliver what you’re looking for in the cup.

Thank you for taking the time to have a look @bradm !
Yeah I think that is exactly the issue, my way of speeding up the roast was to start at 230c to keep the momentum through the roast, but your profile gave me the light bulb moment that I can actually charge lower but apply more heat after the turning point to avoid either a long roast or too much heat up front creating the burnt flavour, also with a higher charge temp but lower mid the ground colour of the bean was much darker even with similar % weight loss as the two new roasts , leading me to believe high charge also puts a lot more prolonged heating to the core of the bean as well which could be great on some types of greens I would think, but these Ethiopian naturals seem to soak the heat up fast! Leading to burnt Chaff crease very easily adding a very over roasted flavour to the cup and if they roast for too long they loose any brightness, so it was a tough one to roast fast but not scorch them, but I think you helped solve the issue!

Thanks again, and I look forward to seeing more of your roast breakdowns! Super educational and constructive.

Really great post, I got a lot out of your description of how you approach the curve and applying/removing power. I’m going to give that a shot soon.

However, I’m curious what you think that flick is doing to the flavor. I’ve been reading Scott Rao’s latest book, but it doesn’t seem very scientific. My experience has been that the flicks don’t really make a difference, but maybe I’m missing true nirvana. Curious for your opinion.

Exactly. We’re always hoping there is a better cup of coffee out there, right? That, combined with the fact that the flick appeared unintentionally, is why I’ll try to eliminate it completely. Not really sure what it will do to the flavor, but I’d like to find out firsthand.

Flavors are so subjective. To calibrate my own roasts, I’ve purchased a couple of Rao-style roasts from Regalia Coffee and found them to be too light for my taste. Somewhat embarrassed to admit that I slightly preferred the “baked” roast from one of his recent defect kits, perhaps because all my roasts are baked and that’s what I’m used to? Silly, but fun to experiment and learn.

1 Like

Your description for that coffee sounds really good and I am interested in firing up your roast and replying it just to compare myself. However, that link you sent is for a box that looks like 22 pounds of coffee at ~$6.50/lb. I navigated around the Royal website but I didn’t see any other purchasing options, but I may have missed something. Is there any other ways to purchase that coffee that I’m missing?

Yep Royal does offer 1# bags of some of their Crown Jewels, but they’re more expensive per pound. I bought a 22lb box of the Guatemala and split it up with a couple of friends. Have done this several times with Crown Jewels, taking turns on who does the buying, bagging, and mailing. We don’t do that kind of collaborative purchasing & roasting & discussing on this forum, but it would be a nice thing to start. It is very cool when everyone has the same bean, and even better when everyone has the same roaster and can share profiles. If you want to start something up with a Crown Jewel (not the Guatemala :slight_smile: ) PM me and I’m in for 5#.

1 Like

Thanks! I’m pretty overwhelmed with my coffee at this moment but that does sound like a fun thing to do. Especially if we can all share and perfect it, because I kind of despise drinking a ‘suboptimal’ coffee for two weeks.

Anyways, I did go ahead and try your roasting technique and tried to apply your decisions… with a twist. I have 10 lbs of a Kenyan coffee I’ve been testing on, so I figured I would use that. The results are surprising.

The overlay is your fourth roast of the Guatemala, the light roast one. This is my 7th, one-pound roast of this coffee? So there’s a couple of weird decisions I threw in at the end based on the previous roasts.

First thing that surprised me was the major difference in the peak RoR, but I have noticed that when comparing my graphs to other people’s that my roasts do seem to peak lower at similar temperature. However, I do tend to roast washed African coffees, which most likely has a much higher density. At least, the density thing seems to make sense to me.

I started out taking the idea of just using P8 since you said P9 didn’t make much of a difference, but I realized that wasn’t going to work based on the peak, so as soon as I realized I swapped up to P9. I did it again later in the roast when I noticed it needed a little extra boost.

When I dropped heat, I should have stuck with my initial idea of P6, I just was really afraid of the flick because I wanted to try something that was super smooth all the way down.

Finally, at the very end, I picked up the heat a bit because I’ve had this coffee at around 393 ~ 395F and it’s just too acidic. I really wanted to kick it up a bit and try and get some semblance of some ‘coffee flavor’ that anchors the insane fruity flavors of this coffee. So that’s why I was increasing power and such.

I’ve also been toying with the fan in a few of my other roasts and I’ve noticed it doesn’t seem to have such a large impact on the coffee roasting. For reference, I did this last night:

and you can see the intense fan settings didn’t seem to make much of an impact. But I did increase the power to compensate. I’ve noticed the faster fan cleans way more chaff off and smooths out the B-ROR a bit. However, side note, I did notice my bean chute plug was ever-so-slightly opened in the above roast, so that most likely had an effect on why the fan wasn’t so impactful. But, I’ve done similar fan experiments on other roasts without screwing up the bean chute plug.

Anyways, I’ll let you know how this tastes in a few days. This coffee is finicky, a little too far and it tastes like garbage hollow, woody garbage. Too short and it’s like lemon juice is being pumped directly into your stomach. Had a few that were fruity delights, but odds are low. Maybe this is the one.

Here is my second roast of the Guatemala CJ attempting to go darker as I mentioned above. I got the IBTS measured flick the last minute and 12 degrees of development. Had I dropped a minute sooner it would have a roast similar to the light one Brad enjoyed. I tried to carry enough ROR into 1C to get to my roast level in a short time without a flick. I might have to modify the roast again to do that.

I am enjoying a clever dripper mug of this roast dropped at 420* 18 hours post-roast. It is a clear comfort cup to chug with loads of dark sugar sweetness, enough acidic brightness to balance the sugars but with minimal fruit and no detectable bitter or astringent notes. Very drinkable. We will see what develops next week both brewed and as SO espresso.

2 Likes

This is a great post, I am looking to purchase a Bullet, only a bit scared that I won’t be able to get better roasts than my Behmor, but this post was full of details that I really enjoy. Thanks for sharing this.

Thanks for sharing. I don’t do 450 gram charges but my gut is telling me these roasts are a bit fast.

Hi @atkingsbux and welcome!

Are you thinking too fast in the beginning, or toward the end of the roast?

Re: the beginning of the roast, I tried preheating hotter (up to 250C) but saw some evidence of scorching during the dry phase with some beans, so now sticking with 210C preheat and living with the ~5:00 time to yellow (“no more green beans”). This stage doesn’t seem too fast?

Re: the later stages of the roast, you might have a point. I like the ~13% weight loss, and have seen increased weight loss and bitterness, and reduced sweetness and complexity, with slower roasts. But each bean is different so it’s worth testing your suggestion.

Hey, I just wanted to add some of my findings using your method @bradm which are quite interesting.

Here are two profiles of the same Costa Rica Natural Anaerobic beans, with two different methods of heat application at the start of the roast which resulted in a huge difference in flavour.

This one is using the 1 min(ish) soak and then a jump to P9 with a descending power curve, it ended up with a shorter dry end and slightly longer mali phase and shorter dev time, than the next roast however this roast was super sweet and full of flavour which I attribute to the initial energy put into the bean with the short soak and high power, it has a lot of flavour separation and clarity with great sweetness an absolutely brilliant pour over, now onto the other roast.

With this roast I tried to do a more gradual heat application at the beginning making the P6 soak last a lot longer and then only going to P8 to see what effects it would have in the cup, you can see it ended up with a bit of extra time in the dry end (I mark at 165C on the IBTS for each roast for consistency) however as this was the second roast it seemed to go a little faster through the mali phase by 15sec or so which isn’t ideal for comparisons sake but it is what it is, I allowed the dev to go up by 1C (bean probe) over the last roast to see what that might do to the cup as well, this roast is not flat per say , it has good flavour and it’s fully developed but it’s a lot more subtle it’s like the bass got turned right down and just the treble was left, it’s a very very clean cup much more tea like and crisp which might be down to a lower extraction % but I’m not so sure as if I push it over 3mins as a pour over it starts to become over extracted.

The effects of the initial heat application seems to play a major roll in the end cup as from what I have seen online the second roast should have maybe have been more developed with a longer time and slightly higher drop temp and higher weight loss but because of the initial heat application it created a very different lighter cup. both of these taste really good just different, my partner who works at one of the top rated cafes in Europe was actually surprised it was the same bean as the flavour difference is so vast between the two roasts, which is really surprising as they look like they should taste very similar

I’m starting to believe more and more that the start of the roast is actually a better place to start to modulate some of the flavour notes in coffee as it sets up the way the bean deals with heat throughout the whole roast beyond just charge temp.

anyway I though I would share this as I found it quite interesting the difference in flavour from a subtle difference in initial heat application, I need to test it on more beans but it’s food for thought, me and my partner actually still prefer the first roast curve over the second on this bean, but I think the second curve would work on some of my other natural beans that seem to end up with too much “bass” for lack of a better way for me to describe it.

4 Likes

Hey @jacksmith121asdk this is really interesting. Overlaying your two roast shows that they’re VERY similar, both good looking curves with reasonable numbers. Really appreciate your tasting notes, that’s the bottom line after all. Congrats on successfully tuning this bean!

The proof is in the cup. But P8 seems to put your first crack a bit early, before 8 min.

1 Like

So after reading @atkingsbux sensible advice I tried some more fine tuning, this time stretching the mid phase. Here is the result, with the lightest, best roast from the original post in the background:

This profile change cuts power from P8 to P6 one minute earlier, and increases fan from F2 to F3 one minute earlier. The result was a 30-second delay in FC. Keeping the same 1:30 of post-FC development led to a 30-second longer total roast time, and just 1C lower drop temperature. Weight loss decreased slightly, from 12.9% to 12.1%. This seemed like a good test.

With 5 days rest, the hot drip-brewed cup had pleasantly bright acidity with light lime and kenya-like winey notes. Smooth body with excellent cane sugar sweetness and caramel hints. Light bitterness with a classic Guatamala backbone. But on cooling the sweetness faded and lemon-lime strengthened to dominate. Still a great cup, but best when hot, and for me not a clear improvement over the quicker roast. Interesting, eh?

3 Likes