Beginner roaster struggling with Ethiopia Dry Process profile

Hello all! I’m a beginner at roasting and have just recently acquired a Bullet as an upgrade from a Behmor. I have tried 6 slightly different profiles on an Ethiopia Dry Process Hambela Dabaye, but I have consistently produced coffee that is just plain disgusting. By that, I mean exhibiting a very astringent taste (not sour), which gets worse on the finish. I know the coffee is not under-extracted, as I can use the exact same pour-over methodology with a professional roast and create a beautiful cup. Am I still under developing these beans?

I’m trying to follow the Scott Rao guidance of sufficiently high initial energy followed by an ever-declining RoR and a DTR of 20-25%. I’ve provided my best profile by these standards that I’ve achieved so far. Any suggestions or advice are much appreciated!

4 Likes

That’s a nice curve, you seem to have great control over the roaster! I think its possible the beans are underdeveloped. Are you aiming for a light roast or something darker? What was the charge weight?

I usually do medium to almost-dark roasts, and my temperature curves are a few °C higher than yours across the board. I’ll often drop the beans at 215…220°C IBTS.

For example, this 11min, 500g, Mexican washed, medium roast turned out really well, I thought. https://roast.world/@damon/roasts/n6CwSK4jQCBukx_FJbUBY

1 Like

Yes, I was going for a City, maybe City+ roast level. Charge weight was 350g.

Hi, I can only go on to what has worked for me, I would try and reduce the time to yellow and increase the time to first crack, and maybe increase the preheat. Super nice ROR though, none of mine look that good.

8 Likes

My 2 cents worth of advice on your roast

I believe your charge IBTS temperature is too high for a 350 gm roast. It could cause initial scorching on the bean surface.

Then, I think your subsequent heat settings may be too low resulting in a bit too long a roast and not enough momentum going into first crack. Dry time is optimum at 4:15-4:45 with these batch sizes. I mark dry end at about 340-345 F. Yours appears higher than that. I’ve learned from others that ratios of 45% for dry, 35% for mallard and 20% for development generally yield stellar roasts, In your profile, you might be scorching before dry and then slowly baking at the end.

I find using charge sizes of 325-375 gm that Ethiopian Naturals roast better a bit quicker. Also, they require a lot of rest (7 days or so) before they cup at their best. I have had very good luck with a 340 gm profile for all my Natural Ethiopians. Here is an example you might want to try. There are others if you care to look. Good luck

10 Likes

@geoffreychilds offers solid advice. The initial scorching is sneaky because it may not be obvious by the end of the roast. Sounds weird, but use the tryer during the dry phase once in a while to check for this kind of scorching.

4 Likes

Did you really roast that at -17?

Hi,
Having a similar problem. I’ve no idea how to follow someone’s profile. Copy and paste or manual copy. I’ve roasted about 15 batches and they all suck. I’m almost ready to abandon and go back to my Behmors. When I started with those the coffee was amazing,
Signed,
Frustrated!

1 Like

I second the rest. I was frustrated when I first started, but the same natural Ethiopian that wasn’t pleasant when I brewed after two days was quite good after resting for 10!

2 Likes

I’ve no idea how to follow someone’s profile.

One way is to find a promising roast on RoastWorld, click Save Roast, find the roast in your RoastTime app, then click Playback.

For example, using a @larryaknigge roast that won an award:

RoastWorld - Ethiopia Yirgacheffe Banko - Light Contest Roast

Save a roast

Find it in RoastTime

Play it back

Also

  • Make sure you use the same preheat and charge weight.
  • Calibrate your fan, if you haven’t already.

(thanks for sharing that roast profile, @larryaknigge )

edit: P.S. Don’t give up! :slight_smile:

4 Likes

I find that playback of a roast be it to repeat one of your own roasts or to copy someone else’s is not reproducible or useful. There could be too many variables such as heating and fan cooling differences between units and especially ambient temperature.

What I do is to
1-note the preheat temperature and bean temperature probe at charge and make those as close as possible to the roast I want to emulate.
2- Write a flow chart of the desired roast where I note all the power and fan changes made and the IBTS temperature they occurred. Use the same weight of beans as you are copying.

Note the below profile is entirely made up.
charge to 1" P7 F2
change to P8 at 1’
change to P7 at IBTS 300*
change to P6 at IBTS 345* (yellow)
change to F3 at IBTS 360*
change to F5 at IBTS 380* - follow through start of first crack and lower heat and raise fan as profile calls for.

Hope this helps.

4 Likes

I have been trying what @GeoffryChilds has suggested above, but with the difference that I have been creating Recipes from my and other’s profiles. Recipes are basically flow charts. “When this happens: do this” or “When IBTS = 300 change the power to P7”

So far, this has been mostly unsuccessful.

The recipe functions do not act the way that I am expecting them to. I probably don’t understand how Aillo is implementing their logic structure. I am very familiar with writing PLC type ladder logic and understand ‘and’ and ‘or’ statements. I have burned through a lot of beans chasing this. (almost 25 pounds) The neighbors love me as they get my scrap roasts (which are still very good)

I am currently making very small changes, limiting the variables. Sometimes just changing when the fan turns on by 25 seconds and running again.
I am a little frustrated.

2 Likes

Yeah, playing someone else’s profile is not going to be a perfect reproduction.

When replaying my own roasts, though, I get very consistent results. The first roast of the day will run a little lower, but only by a few degrees.

For example, four recent roasts using Playback. You can see the first roast of the day was a little cooler, but the other three are very similar.

I use playback a lot to learn a bean. After a few playbacks with edits, I usually end up with a profile that I like. Then it’s weigh, charge, Playback, drop, bag, repeat. About 1/3 of my roasts are unmodified playbacks, I think.

I try to be consistent about my between-roast routine. (like empty the chaff chamber every roast). And I’m roasting the same bean, from same lot, of course.

3 Likes

For what it is worth… I did two India Monsoon Malabar about 3 weeks apart. The first batch I used what “usual” 500g “recipe” (not programmed but I note the steps I take since where I am with winter the ambient temps changes) … the cup result wasn’t optimal even after 3 weeks of rest (I had to blend it to cut the funkiness to use it up). Note to self was “use lower PH temp”… 2nd batch I used a lower PH temp and the rest of the “recipe” was pretty much the same, and guess what… the Malabar shined this time. It didn’t have the funky edginess. I had the Malabar once nearly 10 yrs ago when we roasted it in a roasting class on a 12kg Probat and I remembered it was a stellar cup for an aged bean. My lesson is figure out your “recipes” (because how you like your coffee is personal) and adjust to the bean as necessary. I will credit @bradm and @cash0612 for giving me the starting points for 350g and 1kg profiles (respectively) to work with. I’m now mostly roasting 500g and started on 1kg recently. Next up is to really learn more about “head soak” for the 1kg which I think would be needed for something like the Malabar. I have too much environmental variables through the 4 seasons here in the New England to do playbacks or just run a preconfig recipe. I keep a note book for that reason :slight_smile: (old school).

2 Likes

Don’t have any experience with Monsooned Malabars, however, of late, have been doing D9 at Charge, D7 at Turnaround and D8 at 135°C till drop and that has given me much better control of the profile as compared to increasing D to 9 on Yellowing (160°C). Sticking to D8 appears to give that little extra momentum to 1 KG batches. Hope this helps in your roasts.

1 Like

Elliot Sachar

See great taste and long after taste

2020.02.16 | Ethiopia Dry Process Guji Shakiso Hambela Dabaye

arrow_backarrow_forward

START

Preheat Temp

240

°C

WEIGHT

Green 500g

Roasted 426g

Loss 14.8 % (74 g)

FIRST CRACK

IBTS 199.4 °C

Time 07:52
END

IBTS 208.7 °C

Delta Temp 9.3 °C

Total Time 09:28

m

I can’t tell without tasting it, but that seems to be a very long roast for an Ethiopian natural. To get the sweet and fruity flavors, I typically shoot for a 8-9:30 total roast time and 1:30-1:45 of time after first crack before dropping. Usually shooting for a target temperature of 202-204C on my IBTS with 460g of beans.

Using this method, you’ll have a very low development percentage and a weight loss around 12-13%, but I find that works best for naturals.

I did attempt a natural roast recently where I extended the total roast time a bit, but I don’t think it improved the coffee. Maybe a little more chocolate but it’s a tad bit flat.

2 Likes

Do not get discouraged, I think i wasted 10-15kg when i first started with the bullet! Even if i was roasting for 5 years on another drum before.

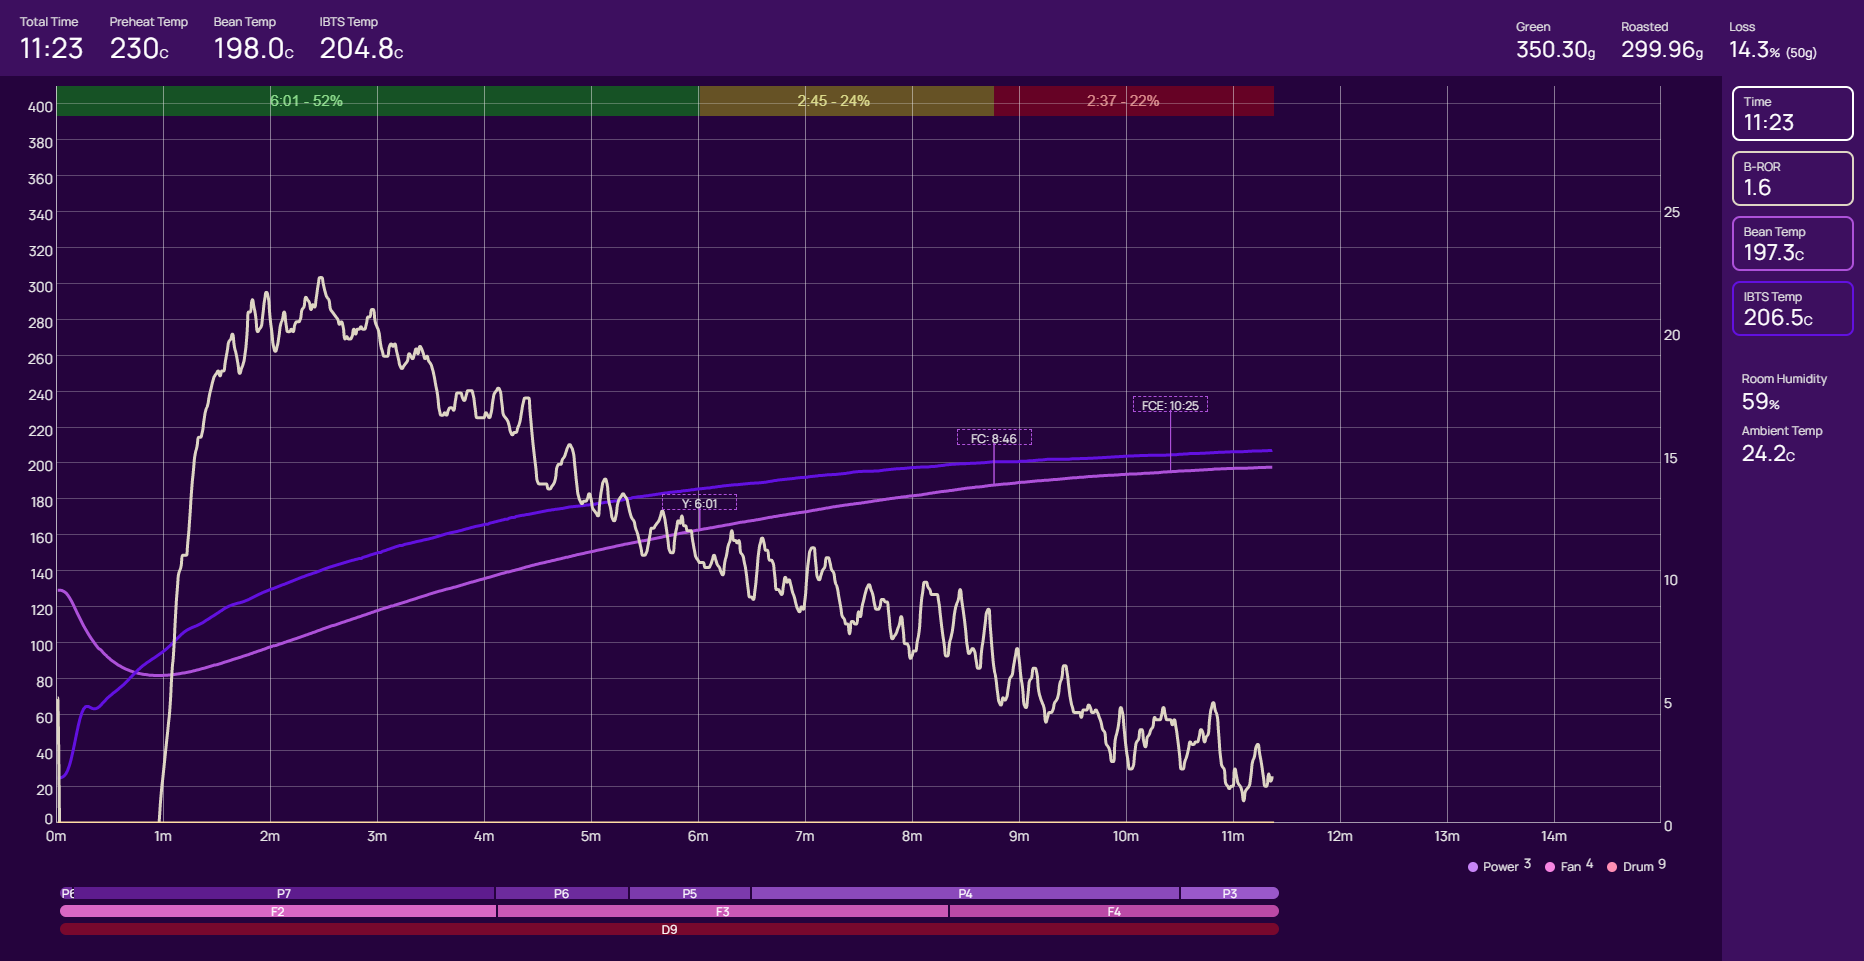
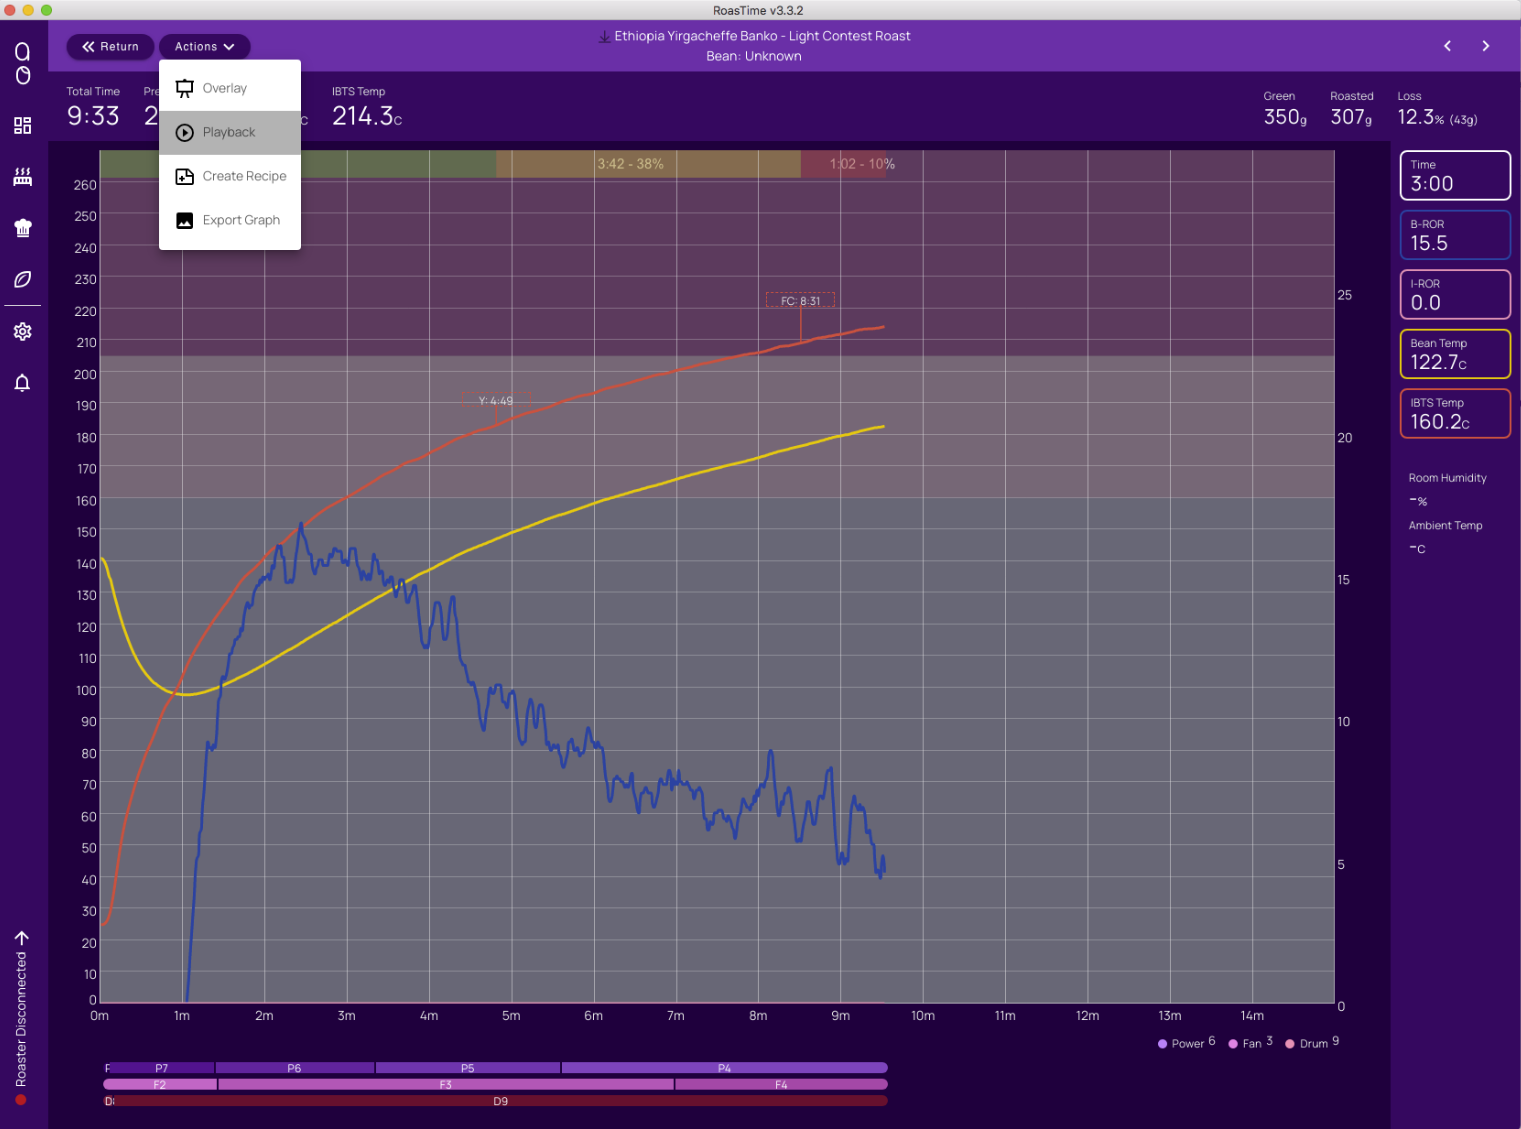
My advice is to get more energy at the beginning of your roast (in the curves you showed, your roast is too slow; also for me it is always better when i start the fan with f3 whatever the roast). Your RoR is nice but that is kind a necessary condition not a sufficent one. Meanng that a constantdeclining RoR will not guarantee a nice cup. As Rao is stating in his last book, do not focus too much on the 20-25% DT (at last when you begin to roast with a bullet).

I guess my first advice would be to practice with cheap(er) beans. Your first goal is to identify at which temperature the beans will crack. The IBTS is perfect for that because it is more constant than the probe (for me anyway). I also clean or make sure the IBTS is clean before each roast session. The front plate is so easy to remove with the tools provided. It takes 5 min and it guarantees a more constant reading (remive the heavy handle before unscrewing the plate).

I also noticed that 400g and above are easier to manage (and replicate). I try to roast with same ambient temp and humidity too. I have an apparel that measure the grain moisture also before roasting but that is usefull to know only when you are more advanced (and try to achieve a pefect cup as i guess we all trying to do eventually). My first big succes was when i dared to roast 800g. (by the way whatever the size of the roast, same beans should crack at the same temp).

Once you have learned how the beans behave, it is easier after that to adjust your roast. With the IBTS you can simulate a gas dip as described in RAO if you want. I have done that and it works well, but not necessary on every kind of beans.

Work on one thing at a time meaning do not try to fix everything at once. I got many roasts with perfect declining RoR that was not as good as some without the perfect RoR ( but avoid imperatively big RoR crashes and flicks). Moreover these non perfect RoR were good to drink right out of the roaster without any degassing (but of course improved after 4-5 days). The smell of the roast right after cooling is a very good indicator of your success. When you will smell it, you will understand what i mean afterthat.

Finally and i find this very important, Follow a warm-up procedure (and between batches protocol) as suggested in RAO’s book. Use IBTS. Pre-heat at a higher temp than your charge temp for at least 40 min (for you first roast). So if you plan to charge at 220c, preheat at 240c for 40min, then turn it back to 220 (should take 4-8 min). then charge. Note the bean temp probe (not IBTS, for next time you want to charge around the same Probe temp; if probe temp is too low compare to last time, open the charge hole for 20-30 sec until the probe temp is similar to last time and charge).

Good luck! I am sure if you persevere, you will succeeded eventually.

ps you can be inspired by other’s recipe but you should not just try to copy a recipe unless you have the exact same beans with same moisture and similar environmental factors. You mightt get lucky just copying recipe but you will likely miss and learn nothing about the beans you are trying to roast.

7 Likes

Do not get discouraged, I went through that also. Read my other answer to this post, it could help. I wasted a lot of beans first trying to follow other’s recipe. You have to find the secret of each beans and you can only achieve that by experiencing not copying recipes. So pick cheap beans, find out at which temp the beans crack (even if you miss your batch, so you can do it with 200g but be prepared to loose this batch). From there you can play with pre-heat charge, charge temp, heat, fan and drum spead (d8 or d9). Also when you first have the bullet, we have the tendency to charge too low (especially with the new model).

Roasts under 400g are more difficult to manage in general. once you have find the FC temp, dare to roast a larger batch.

Do not abandon you will get it!

1 Like

Love the detailed advice, thank you! I attempted a 800g roast this morning of a Brazil Natural. The RoR isn’t great, but I did the Rao method for preheating as you suggested and tried to put enough energy into it in the beginning stages. I literally just finished cooling the beans and they smell ok, but I obviously haven’t tried them yet. Any thoughts just based on the profile?

1 Like