I’ve been trying to develop a 5 minute dry end, 9 minute first crack profile to match one of the profiles I use on my Artisan 3e. For now I’m using 500g batches. I have followed some of the profiles on Roast.World and also looked at Royal Coffee’s profiles. However, despite dropping the charge temp from 250 C (482 F) to 220 C (428 F), I am still getting scorching. Two of those profiles are here:
The 220 C charge temp is based on Royal Coffee’s advice. The 250 C is based on Aillio’s. As I roast, I don’t see the scorching until later in the roast, but I suspect it is happening in the beginning.
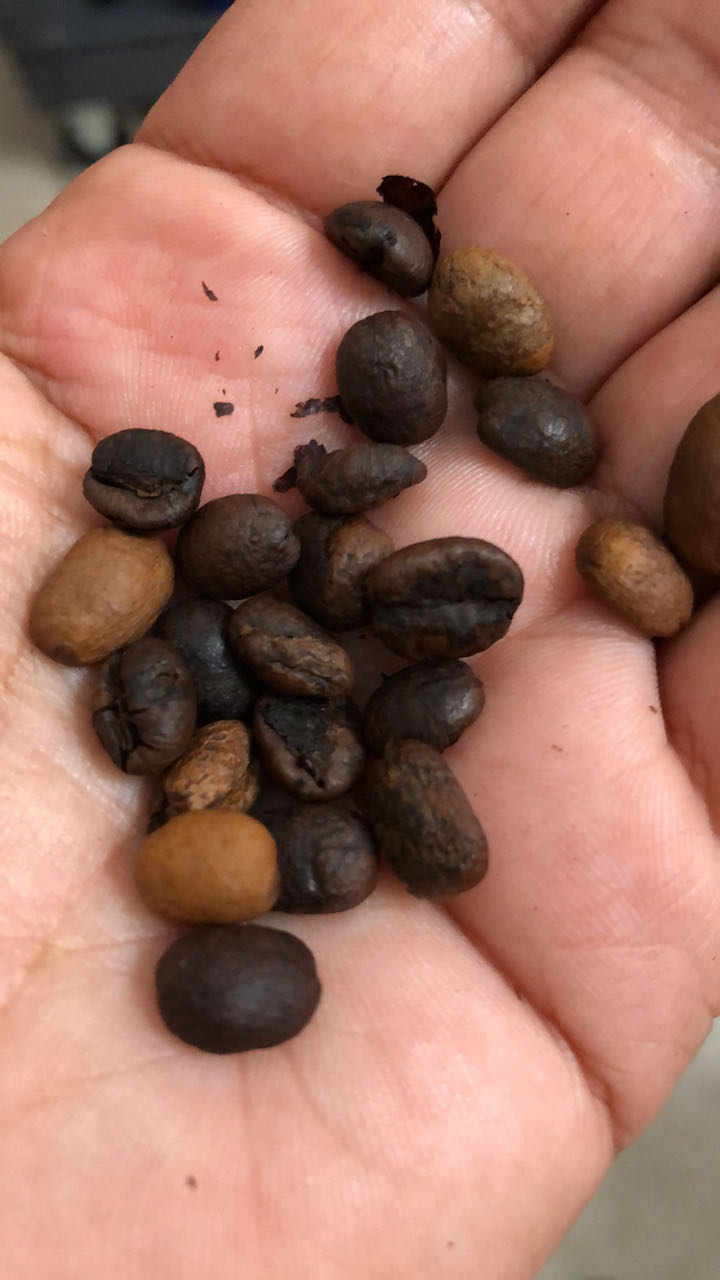
Here is a photo from the first roast above with the 250 c charge temp:
Two possible issues: First, my machine shipped with firmware 596 which is supposed to provide more power for 120v machines. Second, I am running the machine off of an EcoFlow DeltaPro which provides pure sine wave power, because our mains power is really flakey here in the Houston area, especially when it is so hot outside and the AC units are working overtime.
Are you getting ashy/burnt/smoky flavor in the cup?
Nothing about the roast profiles seems to indicate that you’re hitting the beans too hard. I’ve seen other discussions that say natural/honey processed coffee can look dark/scorched due to the residual material on the green coffee that would be removed by we processing.
Also seen talk about too high of a drum speed pinning beans to the drum wall for longer, increasing conductive heating and thereby encouraging scorching. Your PH and power levels are pretty normal for a 0.5 kg roast though (I was using about 250 and P8/P7 for 455g roasts with my v1.5, now using 235 and P7/P6 after the v2 upgrade).
it’d be interesting to see what a kill-o-watt or other power meter shows for your roaster running at that P7 level when hooked to the EcoFlow versus your mains…
I have not cupped these yet. These are the third and fourth roast I’ve done. I threw the first two away. I’ve been making adjustments on each one. I regularly roast this coffee on my Artisan 3e fluid bed air roaster with no scorching, tipping, etc. However, I have that roaster under PID burner control, so I just draw the curve in Artisan and let it go. As long I don’t let the loft get too low or too high and don’t exceed a 2 lb batch, the results are good.
I can try the Killowatt later today. The Ecoflow shows watts used at all times, but I also use it to power my laptop and the exhaust fan while I roast. I have only used the Bullet through the EcoFlow due to concerns over frequent power outages and voltage dips. I think I did one seasoning roast using mains power before I got the Ecoflow delivered. Today’s roast was all solar power!
Agreed. The latter part of the roast in the last roast above was also too slow, so I tried to bump power up (too late). So if the scorching is due to the first part of the roast, I will still need more power to hit first crack at 9 minutes.
oh yeah, forgot that you’d gotten different results on the air roaster!
perhaps shooting for more convective heating (as your air roaster) and less heating through the drum as the roast progresses - so maybe a moderately high PH but with a low power soak to start, followed by moderately high power but with a higher fan setting (but anything past F4 tends to cool in my experience)?
You’ve got beans that are much darker than I would expect from a roast that is dropped at about half way thru 1C. This is a WAG but you might want to check drum speed at D9 as evidenced by the beans missing the tryer. I’m wondering if the beans are staying too long against the drum. If have an issue like that and have limited the drum to D8.
Also those light colored beans can find their way into a roast if some of the greens hang up in the bean chute. Check the chute after you charge the greens and confirm there’s nothing left behind.
I do a purposeful ‘heat soak’ (slower temp increase). Look for some posts by @quartzglen in (I think!) early 2019. You may find something of interest in his suggestions.
I don’t know what your background is so if you’re a techie I made this too simplistic and I apologize. I just want to be sure any user reading this later who doesn’t have the background can hopefully understand and use the procedure.
Mark the end of the drum shaft so you have a reference to keep track of drum rotations (Magic Marker works fine). Do a fake roast with power set to P0 and set the drum speed. It may be worth it to do all the available drum speeds. Plus slower speeds will be easier to get the procedure worked out. I use the Stopwatch function on my phone to measure time. As the mark lines up at a convenient place I start the stopwatch and start counting. Be sure to start the count at 0! I count 10 rotations (0 thru 10; if you start the count at 1 you’ll end up with 9 rotations instead of 10) and hit the stopwatch Stop button. Now compute RPM-
RPM = 60 * ( 10 / Time ) (Time is in seconds; 60 converts revolutions per second to revolutions per minute.)
Best to repeat it a few times and average the results. And going thru all the settings will point out non-linearities though I don’t know what you can do about it. It’s a simple process but makes it very clear if there are uneven steps in the D# settings.
If you want to drill down into centrifugal force and what it takes to get the beans pinned to the drum you can try this link. It was posted in this note-
For an easy demonstration of speed just try using your tryer with beans in the drum. If you aren’t catching any at D9, slow the drum till you do catch samples and see what speed you need to use. When you see no beans it indicates they are being pitched in an arc that goes beyond the tryer port. I have referred to that elsewhere as being ‘pinned’ but that’s inaccurate. If the beans were pinned there would be no beans noise at all. But D9 is useless on my Bullet if I want to use the tryer and I settled on D8 (and get very few beans at D8, but I do catch some).
Bruce
Edit- I have a V1.5 Bullet that has been upgraded to V2.
Thanks for the info on drum speed measurement. I looked last night and wondered about marking a line on the shaft that spins in the front bearing. I’ll check that out. I tried the first roast above today as an Aeropress. I had already fished out most of the obviously scorched beans. Despite the non-standard (very fast) profile, the coffee was excellent. No hint of baked, roastiness, burnt, or astringent flavors–just very honey-like sweetness as this coffee should be. I then tried the second one where I lowered PH temp, but still got scorching–it was baked. The roast lost momentum and I tried to catch it way too late, then had to drop at an earlier temp than I wanted.
THe first roast was at Agtron whole/ground: 59, 83
Second roast was at Agtron: 63, 91
I have noticed that I get a lot of burnt chaff coming out of the front of the roaster throughout all of my roasts. The chaff appears to collect at the front of the roaster, mixing with the beans there.
I’ve been able to catch beans in the tryer at D9. I just timed all of the speeds, timing 10 rotations in D1 to D7 and then 30 in D8 and D9. I should probably do 30 for all to decrease measurement error.
When I get too much chaff in the front, I turn up the fan. That might also help with scorching, dunno.
I forget which coffee guru pointed this out, but you can often see tipping and scorching start in the yellowing phase. Yellow beans with brown spots become roasted beans with burned spots.
I’ve thought about fan speed. My understanding is that moving from F1 to F3 increases convection heating, but that F4 and above reduces heat through the exhaust. I have Cloudline T4 that is offset from the exhaust port. I run that at 10 after I start the roast. I should also check the level of the roaster. Perhaps it is slightly tilted forward.
FWIW: when I do roast 500g or 1lb, I typically start with a 401 or 410 PH and use P6/F2/D9 until the turning point - a little bit of heat soak and then I ratchet up to P8. I’ve also played around with a D8 to start until turning point. I’m mainly roasting 1kg, but when I do 1lb/500g I tend to stick with the above and my friends haven’t complained of bad coffee. I’ve even played around with lower PH for 500g to see if I can get a bit of sweetness … but haven’t been playing with that much myself.
I came to the Bullet directly from the FreshRoast SR500 which is also an air roaster. It is way different and a learning curve for sure since the beans are in contact with hot metal drum.
FWIW 2: I always cup my roasts even if the beans “looks” bad just so I have a taste reference if the profile indeed went horribly wrong (for my taste).
Recommendations for 1kg roasts? I did a Morten Munchow-style full flame 1kg espresso blend last night. I still got scorching and also triggered the Erc 0004 alarm. First crack went straight into second without stopping. Preheat was 310 C.
Those drum speeds look pretty much like what others have measured. I don’t see anything alarming. The difference between D8 and D9 is bigger than the step change at other speeds and typical of what to expect from the Bullet. As I implied earlier I’d rather the difference from D8 to D9 were less, but it is what it is. If you’re catching beans with the tryer it should be fine.
F2 at the start sounds typical of most here.
I’m with @blacklabs - you’re using a higher preheat for a 500 gm batch than I use for my 550 gm batches (482°F vs. 392°F). But then you’re aiming for a specific time to 1Cs. However you’re getting scorching so you may just have to settle for a long time to 1Cs by lowering preheat.
The final temp for preheat is measured with the IBTS only (the bean probe is measured only to assure BT-RoR is pretty much flat at IBTS = preheat setting (approximately… it’s not fine tuned). If the IR sensor of the IBTS is dirty, preheat temp will be higher than you have set. You might try cleaning the IR sensor (after cleaning the front plate).
In order to know when to clean the IR sensor I keep track of the maximum difference between BT & IBTS at approximately IBTS = 260°F. I look for the difference to be greater than 41F° (the difference is sensitive to batch size; a smaller batch will have a higher difference). After cleaning the IBTS the difference is about 45-46F°. Clean with isopropyl alcohol & a Q-Tip; don’t reuse the Q-Tips by re-wetting with alcohol and going back to the sensor again- clean one each time. Roasting snot that gets on the IR sensor doesn’t dissolve with alcohol- it just softens (at beast!). So it takes a few passes.
One other thing: after a roast I take the beans outside and winnow the beans by pouring them back and forth between 2 bowls. Takes a little breeze to work, so in still air you might need a fan to help move the chaff. It isn’t a perfect solution but it works for me.
Bruce
Edit- wish I could claim winnowing as my idea but I saw it on a Sweet Maria’s video the Thompsom Owen made in early 2019.
R1.10 (Log in | Roast.World) used preheat of 482 F, which is what Aillio recommended for 500g; however, R1.11 used 428F, which is what Royal Coffee appears to be using now for 500g. R1.11 (Log in | Roast.World) used 428F preheat.That hit dry end at 4:41, which is close to my 5 minute target, but then dropped off too quickly. I think a lower PH temp, then soaking, then ramp up to P8 might work as @blacklabs suggested. However, I’m really just getting acclimate by using 500 g batches. I will almost always be doing small sample batches or 1 kg, especially before a market.