For what it is worth… I did two India Monsoon Malabar about 3 weeks apart. The first batch I used what “usual” 500g “recipe” (not programmed but I note the steps I take since where I am with winter the ambient temps changes) … the cup result wasn’t optimal even after 3 weeks of rest (I had to blend it to cut the funkiness to use it up). Note to self was “use lower PH temp”… 2nd batch I used a lower PH temp and the rest of the “recipe” was pretty much the same, and guess what… the Malabar shined this time. It didn’t have the funky edginess. I had the Malabar once nearly 10 yrs ago when we roasted it in a roasting class on a 12kg Probat and I remembered it was a stellar cup for an aged bean. My lesson is figure out your “recipes” (because how you like your coffee is personal) and adjust to the bean as necessary. I will credit @bradm and @cash0612 for giving me the starting points for 350g and 1kg profiles (respectively) to work with. I’m now mostly roasting 500g and started on 1kg recently. Next up is to really learn more about “head soak” for the 1kg which I think would be needed for something like the Malabar. I have too much environmental variables through the 4 seasons here in the New England to do playbacks or just run a preconfig recipe. I keep a note book for that reason ![]() (old school).
(old school).
Don’t have any experience with Monsooned Malabars, however, of late, have been doing D9 at Charge, D7 at Turnaround and D8 at 135°C till drop and that has given me much better control of the profile as compared to increasing D to 9 on Yellowing (160°C). Sticking to D8 appears to give that little extra momentum to 1 KG batches. Hope this helps in your roasts.
Elliot Sachar
See great taste and long after taste
2020.02.16 | Ethiopia Dry Process Guji Shakiso Hambela Dabaye
START
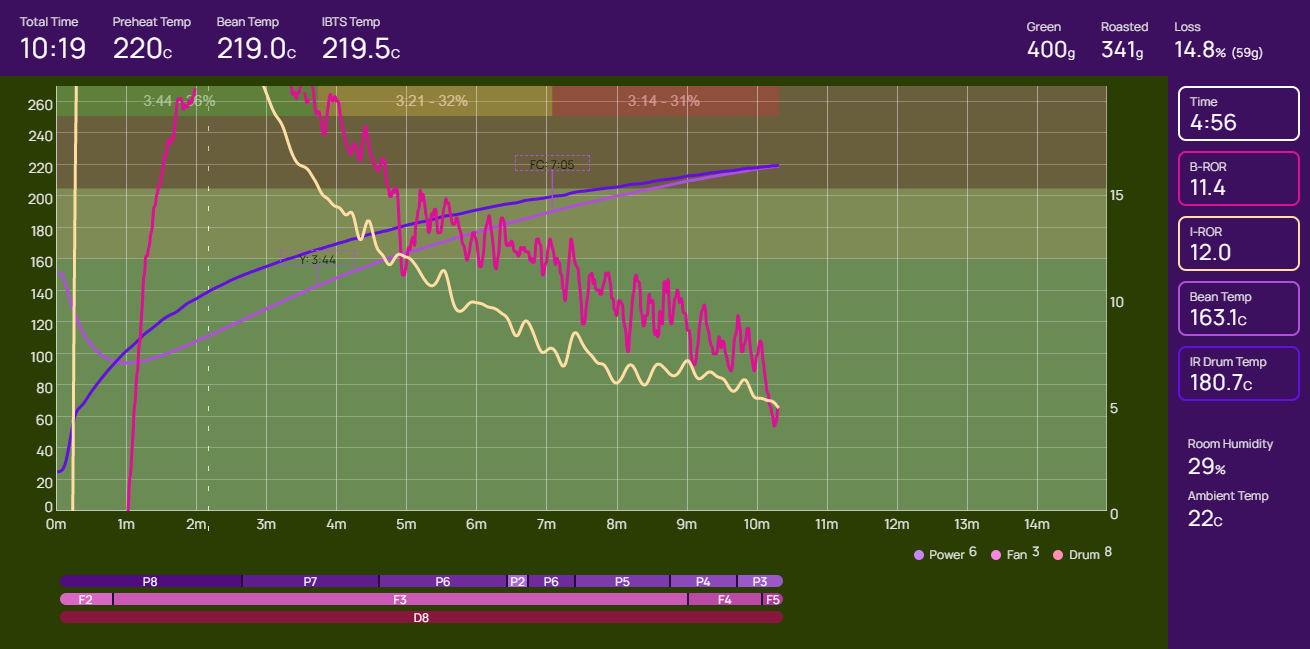
Preheat Temp
240
°C
WEIGHT
Green 500g
Roasted 426g
Loss 14.8 % (74 g)
FIRST CRACK
IBTS 199.4 °C
Time 07:52
END
IBTS 208.7 °C
Delta Temp 9.3 °C
Total Time 09:28
m
I can’t tell without tasting it, but that seems to be a very long roast for an Ethiopian natural. To get the sweet and fruity flavors, I typically shoot for a 8-9:30 total roast time and 1:30-1:45 of time after first crack before dropping. Usually shooting for a target temperature of 202-204C on my IBTS with 460g of beans.
Using this method, you’ll have a very low development percentage and a weight loss around 12-13%, but I find that works best for naturals.
I did attempt a natural roast recently where I extended the total roast time a bit, but I don’t think it improved the coffee. Maybe a little more chocolate but it’s a tad bit flat.
Do not get discouraged, I think i wasted 10-15kg when i first started with the bullet! Even if i was roasting for 5 years on another drum before.
My advice is to get more energy at the beginning of your roast (in the curves you showed, your roast is too slow; also for me it is always better when i start the fan with f3 whatever the roast). Your RoR is nice but that is kind a necessary condition not a sufficent one. Meanng that a constantdeclining RoR will not guarantee a nice cup. As Rao is stating in his last book, do not focus too much on the 20-25% DT (at last when you begin to roast with a bullet).
I guess my first advice would be to practice with cheap(er) beans. Your first goal is to identify at which temperature the beans will crack. The IBTS is perfect for that because it is more constant than the probe (for me anyway). I also clean or make sure the IBTS is clean before each roast session. The front plate is so easy to remove with the tools provided. It takes 5 min and it guarantees a more constant reading (remive the heavy handle before unscrewing the plate).
I also noticed that 400g and above are easier to manage (and replicate). I try to roast with same ambient temp and humidity too. I have an apparel that measure the grain moisture also before roasting but that is usefull to know only when you are more advanced (and try to achieve a pefect cup as i guess we all trying to do eventually). My first big succes was when i dared to roast 800g. (by the way whatever the size of the roast, same beans should crack at the same temp).
Once you have learned how the beans behave, it is easier after that to adjust your roast. With the IBTS you can simulate a gas dip as described in RAO if you want. I have done that and it works well, but not necessary on every kind of beans.
Work on one thing at a time meaning do not try to fix everything at once. I got many roasts with perfect declining RoR that was not as good as some without the perfect RoR ( but avoid imperatively big RoR crashes and flicks). Moreover these non perfect RoR were good to drink right out of the roaster without any degassing (but of course improved after 4-5 days). The smell of the roast right after cooling is a very good indicator of your success. When you will smell it, you will understand what i mean afterthat.
Finally and i find this very important, Follow a warm-up procedure (and between batches protocol) as suggested in RAO’s book. Use IBTS. Pre-heat at a higher temp than your charge temp for at least 40 min (for you first roast). So if you plan to charge at 220c, preheat at 240c for 40min, then turn it back to 220 (should take 4-8 min). then charge. Note the bean temp probe (not IBTS, for next time you want to charge around the same Probe temp; if probe temp is too low compare to last time, open the charge hole for 20-30 sec until the probe temp is similar to last time and charge).
Good luck! I am sure if you persevere, you will succeeded eventually.
ps you can be inspired by other’s recipe but you should not just try to copy a recipe unless you have the exact same beans with same moisture and similar environmental factors. You mightt get lucky just copying recipe but you will likely miss and learn nothing about the beans you are trying to roast.
Do not get discouraged, I went through that also. Read my other answer to this post, it could help. I wasted a lot of beans first trying to follow other’s recipe. You have to find the secret of each beans and you can only achieve that by experiencing not copying recipes. So pick cheap beans, find out at which temp the beans crack (even if you miss your batch, so you can do it with 200g but be prepared to loose this batch). From there you can play with pre-heat charge, charge temp, heat, fan and drum spead (d8 or d9). Also when you first have the bullet, we have the tendency to charge too low (especially with the new model).
Roasts under 400g are more difficult to manage in general. once you have find the FC temp, dare to roast a larger batch.
Do not abandon you will get it!
Love the detailed advice, thank you! I attempted a 800g roast this morning of a Brazil Natural. The RoR isn’t great, but I did the Rao method for preheating as you suggested and tried to put enough energy into it in the beginning stages. I literally just finished cooling the beans and they smell ok, but I obviously haven’t tried them yet. Any thoughts just based on the profile?

Judge the results when you cup it. If you like it don’t fret about the “isn’t great” RoR curve. ![]()
I think the roast is too slow (i.e., turning point a bit late and yellowing definitively too late). I agree with blacklabs. Also the DT Rao’s goal (20-25%) is also only an indication (as he stated in his latest book) and frankly my best roasts were more in the 30-35% DT. However, a crashed roast will always (in my tasting experience) taste more baked (hollower and less sweet). But not having the “perfect” numbers or curves does not mean the coffee is undrinkable. It might still be more than good. It depends of the size and more importantly the length of the crash (or flick). I do not see any big crash on your graph but you might have a relatively stalled batch. I have had stalled batch that still tasted good (but not powerful), and they tend to improve with degassing.
I would try to roast a 400g batch of the same bean and retest the FC temp of the beans. In your graph it looks like the bean FC was around 202c. Once you know for sure the FC temp (from the IBTS) it will be easier. Also i recommend to activate the IBTS-ROR (in the config setting put IBTS RoR to ON). sometimes the probe RoR crashes or flicks but that I figured out that was likely measurement errors as the IBTS-RoR was not even close to any crashes or flicks and the coffee was really good.
With your bean from brazil I would try that: preheat at 255c for 45 min . sometimes the bullet start alone so you might have to go to pre-heat mode more than once (but sometimes it stays there for 45min without interruption). After 45 min, turn the preheat back to 230c and wait for the charge signal (should be 5-10 min). Look at the bean temp probe (not the IBTS). Try to charge when the bean temp shows around 160-163c. if it is around 155c then open the charge rubber, it will have a convection effect and will rapidly raise to 160, then charge (using initial setting P7, D8 and F2), turn it to F3 as soon as you can. Your turning point(i.e., B-Ror=0) should be around 1 min and beans turn yellow between 3-5 min (typically around 3:30-4). When the IBTS temp shows 163-165c turn down to P6. turn down to P5 20 seconds before FC (and that is why you have to know FC temp precisely with the IBTS). after that you have to manage to achieve the desired bean temp (I use the IBTS) without crashes or flicks (on the IBTS RoR). The internal bean temperature will determine the taste of the coffee (i.e., light, meduim, dark) even more than the color.
An alternative (depending of your beans)would be to charge a little bit lower (220c) but apply P8 instead of P7 from the start. Turn to P7 at IBTS 163-167c and to P6 20 seconds before FC. Then when DT=10% turn down to P5. I never touch the heat during the FC until I got at least 10% DT, then I turn the heat down. If you turn the heat down too early, you will stall the batch. Same for the fan. However I started to use the fan before FC like in the brazil bean below where I got a sweet powerful coffee but it took me a long time to understand it and I do not recommend it when you begin with the bullet:

Also you can see that there are a lot of noises in the RoR curves. Many roasters have their software smoothing the curves. It gives you a nice curve but you do not really see what is happening then. Then important is the general RoR trend is downward.
You could maybe also try to do something like that if the first time you notice a crash just before FC. I did simulate a gas dip (by pressing f2 for a short time just before FC) and it gave me a very good cup. Other might have a different opinion but I could not do that using the RoR probe only. I really need the more reliable IBTS-RoR.
Ps Those are both brazilian “soft” beans
Thank you for putting up your Brazilian curves and commentary. Currently working one up on the new to me Bullet. It’s obviously a lot different than my trusty Huky.
Thank you for sharing this. I usually don’t get good results with natural Ethiopians and I think I’ve figured out why. My preheat temps were way to high. I had to preheat at 365F to get the same charge IBTS temp as you.
I also roasted a Sidamo Bombe and while peak ror in the beginning did not match it followed the rest of the curve pretty well right up until the end when FC was starting my roast was beginning to run away and I realized I need to cut heat much sooner leading to a faster roast overall but I dropped it at 406f too.
Even with less than one day of rest this taste much better than any other natural Ethopian I have ever roasted as embarrassed I am to say that. I am excited to see what it’ll be like in a week.
Here’s the roast if anyone is curious. I will try cutting heat earlier next time to try to enter into FC with a smaller RoR like you did.
Thanks to those who provided inputs; they were very helpful. I did a different Ethiopia Dry Process yesterday morning, and after only one day of rest, it was utterly fantastic this morning! No joke, by far the best roast I’ve ever made. This despite the curve not looking terrific. Interesting how the technical mechanics can be a bit off, but the taste is still wonderful.

That’s not to say there isn’t room for improvement in the taste (there is), but I am very pleased with the very good results from even this imperfect profile. I’m excited to unlock the best this bean has to offer with a better profile. Too bad it’s out of stock at Sweet Maria’s now…I would have purchased a bunch more. ![]()
What was your end temp? Curve looks great to me.
The Behmor is easy to get decent roasts on. I’m also having issues with the Bullet—mostly scorching. But after roasting on a Behmor (where I had little feedback about what was going on, but got decent results), then an Artisan 3e fluid bed roaster with a PID’d burner that can closely follow a roast curve using Artisan, I find the Bullet much harder. Programming a set of power, fan, drum changes is like the tail wagging the dog. However, the high power and thermal mass of the Bullet and other drum roasters gives some stability that is not present on the Behmor (lots of heat exhausted and relatively underpowered) and a fluid bed air roaster with no thermal momentum. I’m hoping I’ll adapt soon, because after 12 roasts, only one so far is good and even it was scorched and had to sorted through.
I feel the same way. I’m a coffee roasting noob again. I’ve been roasting coffee for personal consumption for 18 years. Started with iRoast, but most of that time was with a HotTop. Feedback was all sensory, mostly sound, followed by color and sheen then smoke quantity. Now I vent to the outside, so smoke is not a factor. The window is smaller and the beanpile is not up against it in volume for visual feedback. I can barely hear first crack. It’s a different experience looking at plots on a screen. I’ve completed four roasts for consumption, so it’s way to early to say whether the experience is better or worse in any way, and I’m sure it will be at least as good with the benefit of roasting enough in volume to have an evening cup occasionally or give some beans to friends.
I think I’m dropping the beans too early, because I’m lacking customary feedback and chicken out when I can’t hear what’s going on or see that smoke is still just a thread rather than a column. I replaced my RO membrane to be certain water quality was not a factor, but I can tell as soon as I grind that the dry aroma is flat. I tended to roast until first crack is decidedly complete on the HotTop.
In order top give some useful advice it would be good to know your pre-heat temp, batch size and initial Power, Fan and Drum settings.
There are a couple of threads in these forums of the hacks people have come up with to better hear first crack. Do take a look.
I came from FreshRoast SR500 straight to the Bullet, skipping the HotTop, You can still use sensory with the Bullet by using the trier.
As I replied to @toddjohnson in this thread I hope you’ll take the time to really learn the Bullet and not give up yet. A lot of us here are very supportive of each other’s learning journey and there is also a lot in the threads that you can search. I spent a lot of time ready what is already posted here in the beginning, now I am just contributing back where I can.
I have a whole thread with detailed settings (pointers to roasts) and photos here. I suspect that many of us are struggling because with past roasters (including my 3e that can do 3+ pound batches) the basic roast settings from the manufacturer and others work well enough out of the box to give at least a decent result that we can then tweak based on our machine, beans, roasting environment etc. So far I’ve not found that to be true with the Bullet. Aillio’s advice on getting started wrt preheat temps are causing scorching. Even following Royal Coffee’s preheat temps, I get scorching. Morten Munchow of CoffeeMind also mentions that he had trouble at first with 350g batches and he has a lot of experience with relatively small roasters. So I think the bullet is just a different beast that takes a bit more work to tame. I have no doubt that I’ll get it. I signed up for the roasting fundamentals virtual course with Morten for next month. That should help since it is an entire day of synchronous activity.