I recently redesigned my exhaust setup for the Bullet, including the Pro Cooling Tray.
The main reason is, that the strong cooling tray fan was creating an unwanted side effect. Whenever it turned on, smoke started to push backwards, up into the roaster exhaust pickup and back into the room. At the same time, I noticed that my old inline fan was heavily contaminated with oils and chaff because it had been pulling oily and particle loaded exhaust directly through the fan housing. That was enough to make me rethink the entire construction.
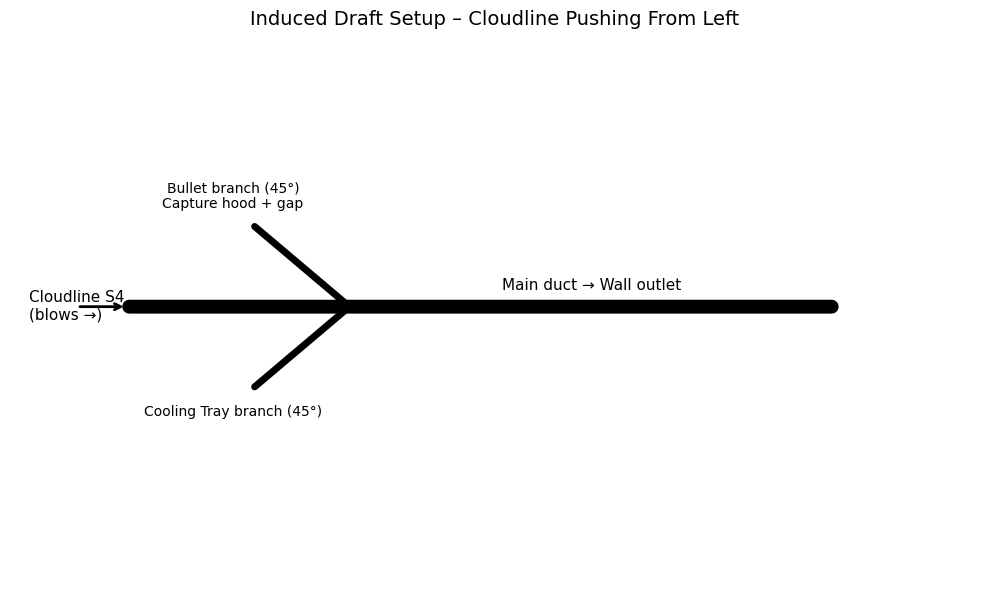
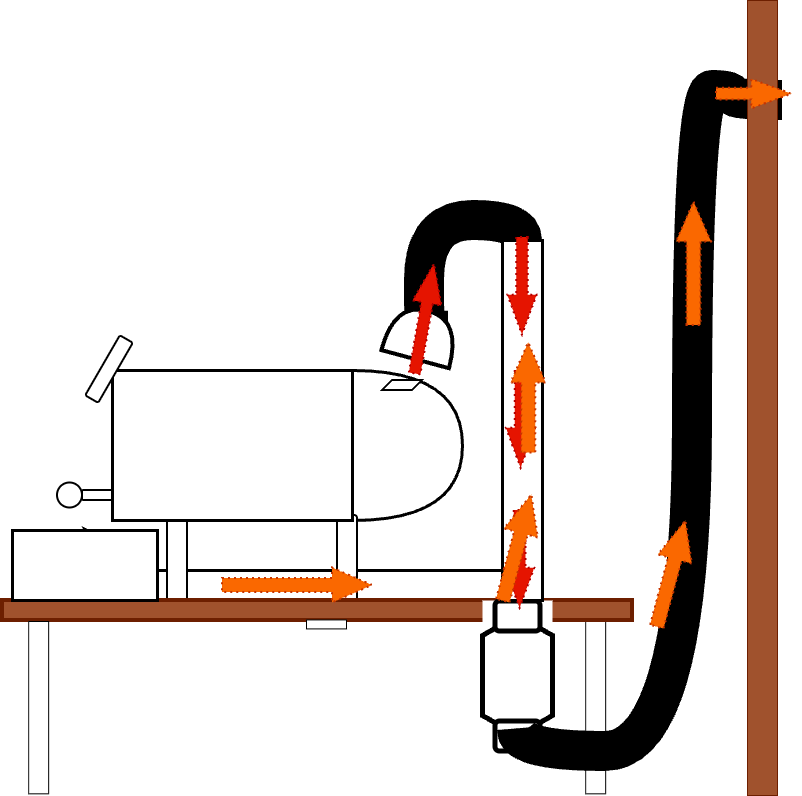
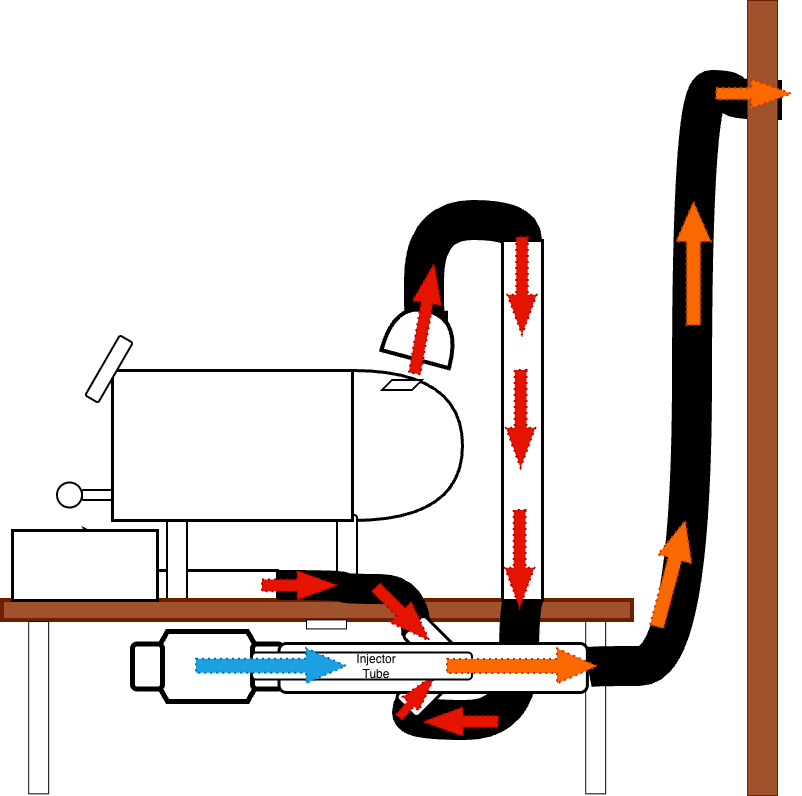
The solution was to switch from a traditional “pull” design to an induced draft setup. Instead of pulling smoke through the inline fan, the fan now pushes clean room air into the main duct that leads to the wall outlet. By blowing with the natural exhaust direction, the injected airflow in the center tube creates a negative pressure zone at the two 45 degree pickup points (branches). One for the roaster exhaust outlet and one for the cooling tray.
The Bullet isn’t rigidly connected, there’s a small gap under the capture hood as suggested by Aillio, so the machine stays freely movable.
This approach solves all previous problems at once:
• The fan stays cool — no thermal stress, much longer lifespan
• No more oil or chaff buildup inside the fan
• No backflow when the cooling tray fan engages
• Smoother, quieter airflow (all fittings are angled with the flow)
• Stable draft for both roasting and cooling
It’s the same principle used in industrial induction hoods: push clean air → indirectly pull the smoke. With a powerful inline fan, such as a Cloudline, this should work pretty well with 100 mm (4”) duct runs.
If anyone is interested, I’m happy to share a proper diagram and part list — and some tuning tips for optimal results with different batch sizes. This setup should bee a noticeable upgrade.
The Infinity Cloudline Fan and the tube with the two branches will be mounted under the table top. This setup should greatlyx enhance the lifespan of the Cloudline fan.
Love this idea, and it would save me from having an awkward pre-filter setup on my fan!
From what I understand of the physics of a setup like this, the junctions where the roaster exhaust and the cooling tray exhaust enter the main line have to be set up correctly to induce low pressure at the junctions and draw the smoke in.
Did you do anything special to configure these, or are they simply 45 degree 4" wyes?
First real world test with full 1,2 kg batches will be conducted next week.
I am pretty optimistic that this will work out as expected. A similar principle is being used at a friend’s home brewery instead of a complicated and expensive range hood. Works like a charm there. So that was the inspiration for this approach.
However, then I remembered that the cooling tray has an extraction fan attached to it and I think it has 5 different speeds to which it can be set.
I can only assume that to cool the beans down quickly, I’d have it set to a fairly high flow rate.
I wonder if this complicates matters with respect to how strongly the Cloudline fan has to blow to still get the desired overall extraction effect, without some unexpected backflow issues due to cooling tray extraction airflow?
This is mitigated, since the cooling tray airflow adds towards the general airstream direction.
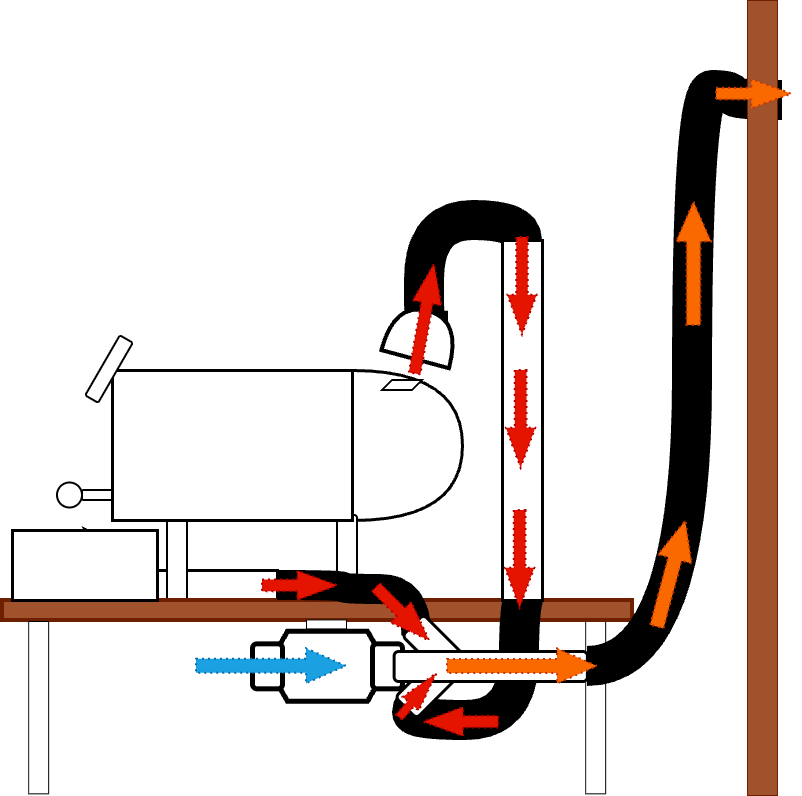
The backflow was exactly the issue with my previous setup which had a T connection and the fan attachment under the T. In my new setup, the injection of additional air from the tray is directed due to the 45 degree branch directional into the airflow of the Cloudline. It can only draft into one direction.
Below is my OLD solution that shows the exact issue with the backdraft.
A fan rated at 200 CFM corresponds to roughly 340 m³/h, using the conversion factor of 1 CFM ≈ 1.699 m³/h. Converted to seconds, this is about 0.094 m³/s. With a 4-inch duct, which has an internal diameter of approximately 100 mm, the cross-sectional area is around 0.00785 m². Dividing the airflow by this area results in an ideal air velocity of roughly 12 m/s in the main duct. In a real installation with bends, branches, and a wall outlet, the effective airflow will be somewhat lower, but the order of magnitude remains the same.
So yes, a 200 CFM fan is well within the suitable range for a 4-inch induced-draft exhaust setup for the Bullet and Pro Cooling Tray.
Not yet regretfully due to time constraints. We had an issue with our heating in my house, so getting that repaired had priority.
About to test that over the weekend.
I noticed that the Y Tube i obtained seems to have an unsuitable geometry and the angles of the inlets are too big. So instead of creating a suitable draft, the airflow even causes some sort of backdraft of unwanted turbulence.
Stay tuned - this concept works in other setting, however the main part, namely the Y-Tube seems to be the main culprit. Another but minor issue is the need for some imperial 4" to 110mm metric adapters to be really airtight.
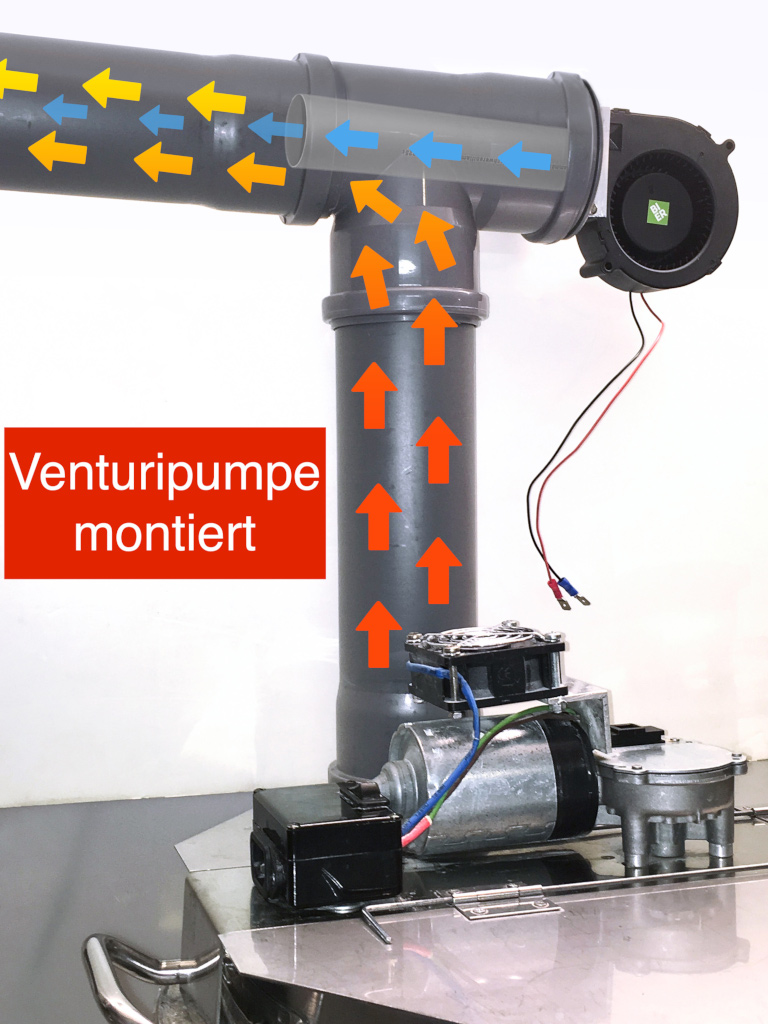
This is the new plan. Hopefully the Venturi Jet that is being created works as desired. I guess that requires some 3D printing for the tube adapters. I’ll keep you updated!
After several attempts, the result of my endeveaour is mixed. While I managed to get some draft, it is not nearly as effective as when having the fan simply sucking.
So in conclsusion: The principal is working, however geometry, fastening the pieces and tube length challenges for a proper setup are not worth it at the moment.
Was a nice try but didn’t work out as expected. So gunking the fan is side effect i am going to accept. Will try to clean it from time to time, hoping that the Cloudlines can be disassembled properly.
When looking at the very simple setup at GoatHeard Coffee with the 6 Bullets and 5 Cloudline Fans, simply attached to the wall outlet with a simple suction tube, this remains the most easy way. When it works for them, it should work for us.
I can understand if you are feeling disappointed about this setback right now, but are you able to elaborate a bit?
I did think that the fact that the cooling tray fan is blowing, rather than just having a passive air mass coming from there might complicate matters.
Fluid dynamics is an interesting science with often counter-intuitive outcomes, so I would not be surprised…
Perhaps one has to experiment with the exact dimensions of the venturi tube and relative flow between the cooling tray, but yes, that kind of Ben Hur project is not really worth it.
Thanks for trying something new!
It is better to have tried and failed than never to have tried at all!!!
Oh well, funny enough, the cooling tray fan inlet worked up until step 3. From there on, it created heavy turbulence and started to backdraft.
When going full load, the draft i was able to create was barely sufficient for getting out the smoke, even with my light to medium roasts.
The basement really smells heavily but it’s getting better over the course of the next few days - hopefully .
Thankfully my wife is very tolerant when it comes to my tinkering.
Sorry, so are you saying the system worked, as long as the cooling fan control was set up to level 3, but not above that?
Is the “turbulence” perhaps the air flow from the cooling fan pushing back up against the (relatively speaking) static air mass in the exhaust pipe, simply because the venturi effect is not strong enough?
Would a more powerful fan feeding the injector tube provide an improved outcome?
Yes, I guess your assumptions are right. My guess is also that the static air mass and the additional pressure from the cooling tray led to a collapse of the venturi effect. An even stronger fan would likely not help that much. It also creates a lot of additional noise.
Today I am planning to mount the fan to the wall and have a simple Y as near as possible at the fan and the wall outlet, so that additional air from the cooling tray does not backdraft towards the smoke hood but takes the shortest path with the least resistance which is trough the fan directly out of the wall outlet.
Fingers crossed