New R2 - Questions on astringency, under-development

Hi all -

I researched what I could find on this topic, but I’d appreciate some perspective on the results I have after my 7th roast (including the 3 seasoning roasts).

I’m mainly an espresso drinker (Lelit Bianca), but I’ve been roasting for years. This is my first drum roaster. I had an old fluid bed roaster many years ago, a convection oven + popper that I had put together, and most recently a Behmor.

In all cases, I’ve had consistent and good to sometimes great results. So far, in the R2, I’ve had roasts that are what I’d describe as astringent. Tannic. Flat.

I recognize those are signs of being under-developed. I included my last two roasts to give you a sense of things.

The weight loss, the development time, etc. seems like it would indicate that the roast would be developed. The color does indicate more of a Full City roast level, but I understand (correctly?) that color as a guide for drum roasters could be misleading.

Could it be that it is actually developed, but there’s another issue involved?

Given my past success with other roasters, I’m a little concerned that I’m getting these results. I’m of course ready and willing to invest the time (already invested the money), but any guidance and direction would be helpful.

Thanks!

In the context of roasting for espresso on a drum roaster, the first thing I see when I look at those profiles is how fast they are. The second thing I see is how short the development time is.Drum roasters almost always take longer to reach a given level of development than air roasters.

I know there are a lot of third-wave roasters who are really pushing shorter times to first crack now, but the advice I’ve been given by the old school is that longer times to first crack result in more complete internal bean development, and a smaller spread between the internal color and the external color. The spread, and not the external color, might be the source of your flavor problems.

And most things I’ve read (and in my limited experience) indicate that sufficient post FC development time is needed when you’re brewing for espresso.

A given color can be achieved either with a higher end temp and a shorter development time, or a lower end temp and more development time.

Now for the personal opinion part: I would personally try to stretch first crack out to 9 minutes or more, and apply at least 2:30 in development. I think that ending at 213C (which is lower than my usual), you really must ensure adequate internal development and post-first crack DT.

FWIW, I recently roasted a delicious natural Ethiopian to a similar end temp, but took my time getting there. The espresso was a bit high in acid for my taste, but extracted well and had a lot of really nice characteristics.

Last thought-- I would try to avoid over-emphasizing temp comparisons between roasters, even the same model. It’s much more useful to use them as a guide to reproducibility on a given machine, with a given bean, etc.

1 Like

the Bullet is perhaps the opposite of air roasting. so you may have a short learning curve ahead.

also it may be a drum roaster, but it does not roast like a gas/flame drum roaster either. the Bullet is sort of its own thing, for better or worse.

Would be interested to hear your thoughts coming from air roasting to Bullet, as there is likely to be some unique aspects about both.

That’s helpful, thank you.

I’ll take your recommendation and try stretching first crack out to ~9 minutes and extend the development time. Will report back.

1 Like

In my experience with the air roasting - for at least the more consumer-focused roasters - is less control, less power and therefore less ability to influence the timing of the roasts.

On the Behmor, for example, I’d typically need anywhere from 12-15 minutes to get to FC for 400 grams.

I never had this astringent character. They always cupped clean, fruity, low roast character unless roasted Full City+ and beyond, and rarely any defects.

1 Like

yeah, induction is pretty reaponsive. in terms of conductive energy from the drum, it is potentially the most reaponsive. but in terms of airflow, which is arguably more important for coffee roasting, the airflow is pretty laggy.

Just to be clear, you can make espresso with any roast type, style or level. If you ask those that want to say it, they’ll tell you that the roast level is just to facilitate the barista’s work. Espresso is a brewing thing not a roasting thing. Since you’re at home, as far as I understand, you don’t need to be efficient and fast when making espresso. So, it will be a taste preference, not the roast level.

Although you’re using the R2, which I haven’t used, 230°C PH seems a bit excessive for 300g.

The Costa Rica might be baked, as there’s a significant drop in temperature from FC to end of roast. The colour is important, but not if you bake your coffee. You can read more about it here, and the example given there looks very much like your screenshot. Don’t make too many adjustments post FC. It’s better to drop earlier than to bake the coffee.
What is Baked Coffee? (MOST PROS DON’T KNOW!) — Scott Rao

As for the Sumatra, it has really gone wrong in many ways. What you should do is concentrate on specific targets and hit them without having to overcorrect. This means lowering the PH, starting with lower power settings and not making too many adjustments. This is for the 300g batch. When you increase the weight, you must act accordingly with your PH and power settings. Personally, I wouldn’t change the fan settings. If you want, you might crank it up a couple of seconds before drop, but during the roast the change in fan settings gives wild swings.
As morgan said, you want to extend your roasts, but I don’t think 9 minutes FC would be good with such a small batch. That timing should be applied to 500g or more. But that’s just what I think based on what I saw. It isn’t something you should blindly trust. Maybe some people have success with roasting 300g batches on the Bullet for over 11 minutes.

One last question. Have you measured the colour or are you just eyeballing it? When you’re just looking at it, you won’t know if you have the problem of internal underdevelopment because, as morgan said, the inside could be a lot lighter, and there’s no way of knowing other than measuring.

Anyway, take all advice with a grain of salt, or just as a starting point, and try to find your own way.

4 Likes

There are lots of opinions out there, and a lot of anecdotes (including the one I shared) about what works and what doesn’t.

One of the most refreshing perspectives I’ve read on this is from Morten Munchow, who’s done a lot of work on correlating the manipulation of roast inputs to outcomes that people can perceive. His thesis is this: In the end, what you can taste in the cup is really the thing that matters, and only things that drive those outcomes matter in roasting.

Munchow is, like Rao, a consultant who sells his expertise-- that’s important to remember. The rational thing to do is not to take recommendations as prescriptive.

I agree that the most important thing is to experiment, take notes, and learn from your successes and failures. What works for me won’t necessarily appeal to you.

1 Like

Great article. That helps.

True, the PH on the smaller batch I now see was too high, so I was over-compensating (using RoR as the guide) and that caused some of the volatility in the RoR as I was lowering power to bring it down.

I’ve never accurately measured temperature at all in my prior roasting experience, and instead went based on smell, color and just intuition.

No, I’ve never measured the color. Just experience and charts. I thought a refractometer only measured the external color, but are you saying there’s a way to measure the internal development more directly?

Fair point. As mentioned in my other post, this is the first time I’ve really had any meaningful data available to me.

I definitely found myself in the mode of trying to correct the progress of the roast through power and fan, based on what I had understood was more of a need to manage RoR, Maillard time, development time, etc.

I’ll find a more natural balance with it in the next few roasts and see where that gets me.

Also, I completely destroyed 1.5 pounds of coffee in an earlier roast, so that’s why I switched to 300g but I didn’t lower the PH.

I’m thinking:

  1. Lower PH for 300g
  2. Less manipulation of power
  3. Keep fan consistent (I like that suggestion)
  4. More development time

I’ll see where that gets me.

Thanks!

1 Like

Here is a recipe to try and change based on your own style.
Make sure you mark yellowing and first crack. I had the same problems when I first started Aillio Drum roaster from Behmor. It’s also hard to apply professionals recommendation to Aillio. Concepts from all have to be adapted to your location, beans, and style. The things that seemed to help with underdeveloped internal bean structure is increase time before yellowing, and time from yellowing to first crack, of coarse anything done to long has negative effects; therefore I posted a recipe I use often and modify based on bean and brewing style. This recipe is for 750g, so keep this mindful if using on anything below 500g or above 1000g.

RW Recipe for 750g Roast

1 Like

I’ve noticed a lot of these recipes don’t include the time, or am I missing something? Are the charts available elsewhere?

I noticed you increased the fan but didn’t decrease power through most of the roast. Do you find that better than reducing power?

@morgan
I agree with your assessment, but there are some good points that are useful for anybody. The baking part is true from Rao, the colour part is true from Münchow. Those two should be taken seriously. Whatever pertains to mass production of same roasts and same coffees should be discarded, as this is more of a commodity and commercial thing. Why would anyone want to have the same coffee over and over again, when you can have different results, all of them good, roasting just one coffee in different ways. It might be tough for someone with a 10kg roaster, but Bullet users should try many different things and maybe they like different roasts, so they can switch between them whenever they feel like it.

@cosgood.CqHb

What morgan said here. By the way, you can’t measure colour with a refractometer. When you measure the ground sample, it might tell you that it’s lighter than what you see. It is enough to measure the ground colour, although there’s this new trend of measuring the whole bean colour. Recently DiFluid launched an affordable colour meter that measures ground and whole bean. You can also make your own. There are detailed instructions by billc in this thread.
RT 4.3.2 addition to Color Meter dropdown - Feature Suggestions / Roast.Time Software - Roast World Community
Building your own saves you around 200-250€ vs DiFluid, but don’t hold me to that as I haven’t checked the parts prices for some time. Measuring colour is important because it is the main factor influencing the taste in cup. Good luck in your future endeavours.

I think the link has a roast list, time is effectively different most of the time, beans, density of beans, i live over 3000 feet, humidity and temperature is always changing, and and and, many factors can effect time. Take a look at percentages of each phase, but again a lot can affect times in each phase. Roast, observe, note: power, fan, drum…try keeping your variables limited, keep two steady for the most part change one and observe/note the changes. Don’t worry about the graph so much, watch your beans, smell the changes, watch as the bean changes. To answer your question, yes i have stopped changing the power as much, left the drum at 8 after 1 min, and use the fan to control temperature.

how does using the fan improve your roasts for you?

I have better control of roast temp, fooling with power has to much of a delayed effect with spikes in either direction, I can ease the temp with the fan, keep the drum at the same speed and make small fan adjustments. It works the best for me, seems to get a better full bean roast, compared to when I first started. By limiting the bullet roasting variables, P-F-D to small adjustments of one…helped me nail down a recipe with small adjustments as needed for bean and environmental variables.

1 Like

that sounds great. i did a few tests of airflow, but it was difficult to translate 1:1 from using power, or P settings. So i decided to figure out the more standard ways first.

Also, the fan settings seem to have less rotation varition than P9 has in power pulling variation.

Do you have to keep the room temperature more consistent for airflow to work well?

I roast in my garage, and open the door when roasting, todays roast it was 46F, so ambient temperature is a factor, but bean dynamics and roast style have more weight in my roast connectivity/graph.

1 Like

Yes they are under developed likely with a hay or green taste. I have some observations and suggestions that might help and sorry if i write some trivial remarks along:

  • There is a lot of noise in your RoRs. BTW I suggest roasting with both RoR, from the infrared and from the probe. You will notice difference specially just before first crack.

Solution: Roast with at least 400g. You will have much less noise and more consistent reading to correct you roast afterward. Roasting at D8 also gives more precise readings but D9 seems to be ideal speed for roasting with the bullet.

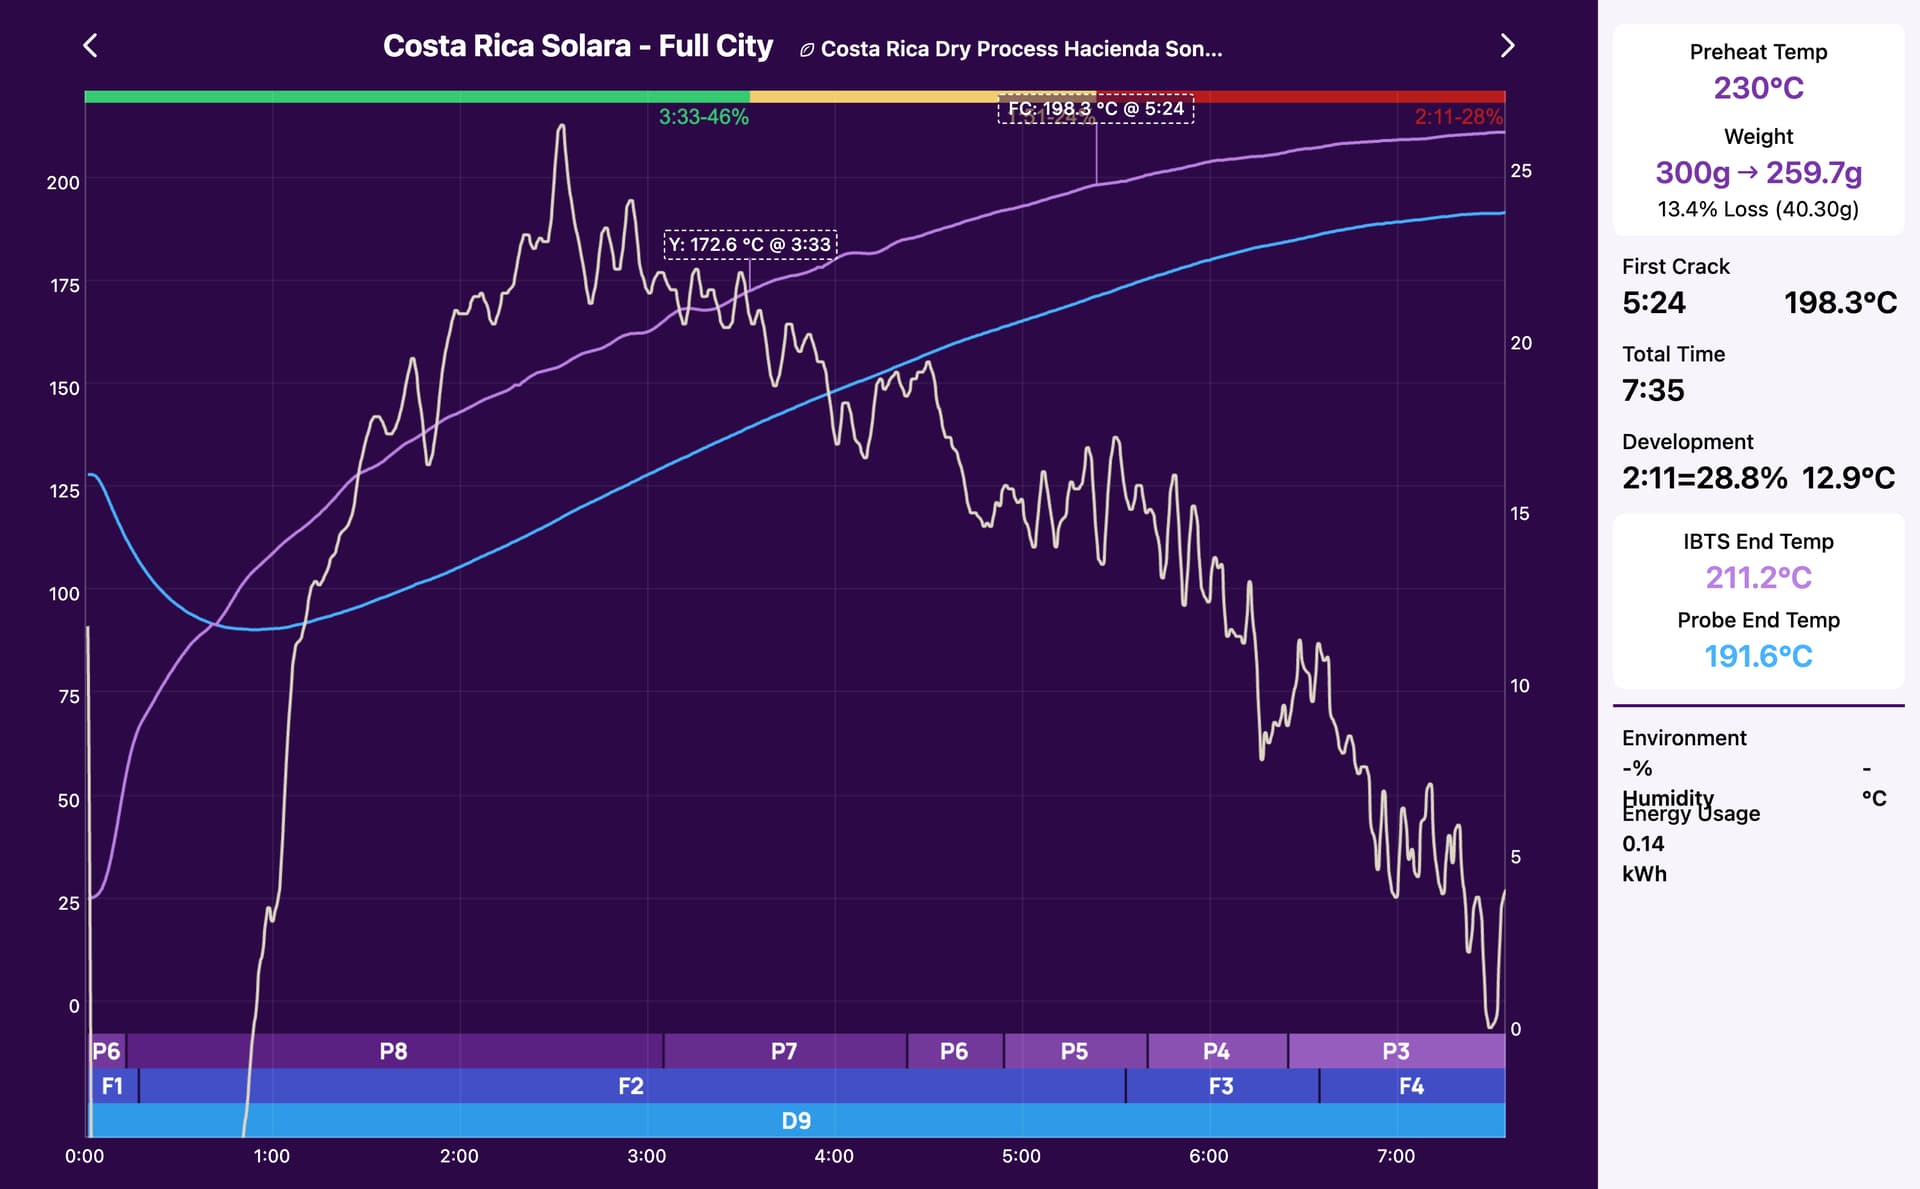
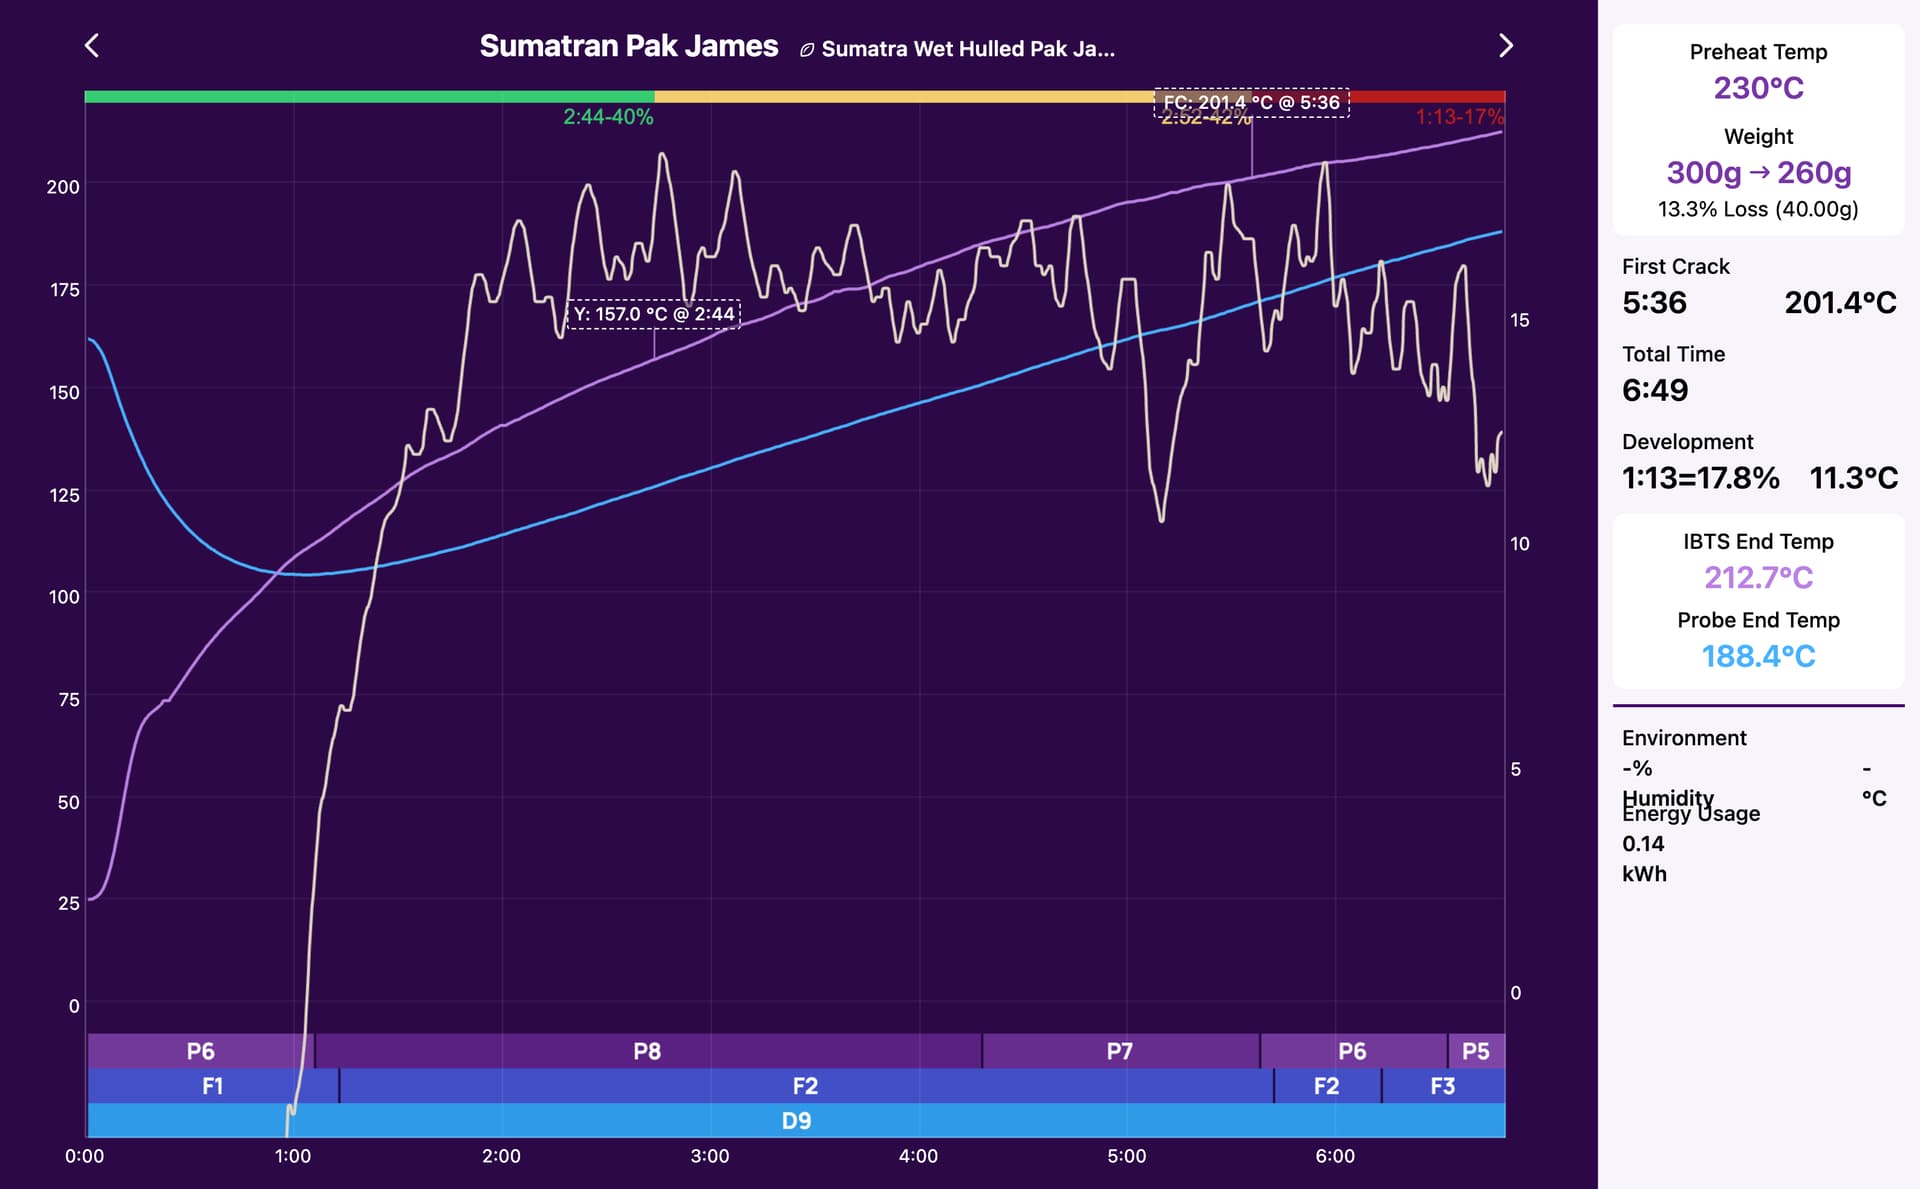
  • If i look at first roast, you do not have enough heat/energy transfered to the beans at the beginning. The level of the roast curve is important too not just the shape. You need more convex (than what you have) after the turning point.

Solution: First roast, do not charge after 20 min when it says charge. Pre-Heat 45-50 min at 5 or 10 degree over the targeted charge temperature. Adopt a consistent protocol between batches. Adjust the charging temperature according to the load (i.e. 400g vs 600g) but also the size and density of your beans. This is very important and often overlook. And eventually the moisture contained in the beans (for example 13%= charge higher than 11%). If you do not have any instruments to measure that, ask your provider. He should be able to give you density and moisture. You should also know how the bean was treated (washed vs natural pulped, fermented, etc). Take also note of the ambient room temperature and humidity to reproduce roast eventually. And the temperature of the beans before charging (not the same if 19c vs 23c for example). The bullet is sucking a lot of humidity. It can drop 10% after a roast.

I suspect here that your costa rica is from Tarrazu where they grow up to 1800 meters, very dense beans (likely around 0,73g/ml). You need more heat or at least not cutting the heat too soon.

-The second graph shows different heat absorption. I guess different size, density, moist and cellulose arrangements in the bean structure. Difficult to say without knowing the beans.

My suggestions:

  • Start with 400g batches (Try once with a 600g, you will see everything goes slower).
    -Start with an easier bean (less dense) to roast, like a Brazilian bean.
    -Mostly stick to roasting the same bean often at the beginning
    -Clean the infrared before each session (not each roast).

Because of beans differences and also differences between bullet models and even between same models, it is almost impossible to gives sound advice on a specific roast. I put a watt reader on my bullet R1V2 and from day to day at the same P, it draws different watt, so heat is affected.

Anyway if you still want to roast the Costa Rica one I would try that for a light roast with a sweet cup profile.

400g I supposed size 16, density around 0,73g/ml, moist around 12%.
Room: 21-22c , 30% hum
pre-heat: 250c 50 min
Charge: 245c (BT should be around 172-175c if not, rise the charge by 5. If higher than 175c lower the charge by 5).

Start with P8, F3, D9
-Hit F4 when BT around 147-150 (infrared should be around 173-175). Should be around yellowing.
-Hit P7 around infrared 180 (Bt around 160)
-Hit P6 just before first crack (190-195 infrared 175-182 bt probe).
-Hit P5 198-202 infrared(184-190 bt probe)
-Hit P4 205 infrared (194 bt probe)
Then reduces P gradually and until
Infrared 212c Bt probe 204c.

The spread between infrared reading and BT will likely be different on your machine. I would tend to say, do not drop if BT is under 200c if you do not like lighthly under developed notes. Anyway it has not much chance to work given all the unknown factors but basically, you need more heat at the beginning. If above does not work, try briefly going to P9 between 100c and 125c with infrared returning to P8 at 125c infrared.

ps your costa rica is not bake. The batch hasn’t stalled either. It is underdeveloped. You cannot follow any indications using time per say as without kwowing the beans characteristics it does not say much. However, your timeline does not shock me for a light roast.

2 Likes

When you say that “P” setting varies in wattage pull, do you notice much variation in the lower Power settings? I really only observe a big difference in P9. All the other settings are less sensitive to ambient temperature in my observations.